
Health
how to clean diffuser without vinegar

Diffusers are widely used to spread pleasant aromas throughout a space, improve air quality, and create a calming atmosphere. Whether used for essential oils or simply to add fragrance to a room, diffusers require regular cleaning to function effectively. Over time, oil residue, mineral buildup, and moisture can accumulate inside the device, affecting its performance and potentially shortening its lifespan.
Many cleaning guides recommend vinegar as a primary cleaning agent, but not everyone prefers to use it due to its strong smell or sensitivity to acidic substances. Fortunately, there are several effective ways to clean a diffuser without vinegar while still achieving excellent results. Understanding these alternative methods ensures that your diffuser remains clean, safe, and efficient.
Cleaning a diffuser without vinegar involves using gentle yet effective materials that remove buildup without damaging internal components. With the right approach, you can maintain your diffuser in optimal condition and continue enjoying its benefits.
understanding how diffusers work
Before cleaning a diffuser, it is important to understand how it functions. Most modern diffusers, especially ultrasonic ones, use water and essential oils to create a fine mist that disperses into the air.
Inside the diffuser, there is usually a water tank, a small disc or plate that vibrates to create mist, and electronic components that power the device. Over time, essential oils can leave behind residue on these parts, especially the ultrasonic plate.
This buildup can interfere with the misting process, reduce efficiency, and even cause unpleasant odors. Regular cleaning helps prevent these issues and ensures smooth operation.
Understanding the structure of the diffuser helps you clean it properly without causing damage.
why avoid vinegar in cleaning
While vinegar is commonly used as a natural cleaning agent, some users prefer to avoid it for several reasons. Its strong odor can linger in the diffuser, affecting the fragrance of essential oils during future use.
Vinegar is also acidic, which may not be suitable for certain diffuser materials or components if used frequently or in high concentrations. In some cases, it can cause wear over time.
Additionally, individuals who are sensitive to smells may find vinegar unpleasant to work with. Using alternative cleaning methods eliminates these concerns while still maintaining cleanliness.
Choosing non-vinegar cleaning options allows for a more neutral and user-friendly cleaning experience.
basic cleaning after each use
Performing a quick clean after each use is one of the best ways to prevent buildup in your diffuser. This simple routine reduces the need for deep cleaning later.
Start by unplugging the diffuser and emptying any remaining water from the tank. Wipe the inside of the tank with a soft, dry cloth to remove moisture and oil residue.
If there is visible residue, use a slightly damp cloth with clean water to wipe the surface. Dry the tank thoroughly before storing or using it again.
This basic cleaning step helps maintain hygiene and prevents oils from accumulating over time.
using mild soap and water
One of the simplest alternatives to vinegar is mild soap and water. This method is safe, effective, and suitable for most diffusers.
Fill the diffuser tank with warm water and add a small amount of gentle dish soap. Allow the solution to sit for a few minutes to loosen oil residue.
Use a soft cloth or sponge to gently clean the inside of the tank. Avoid scrubbing too hard, especially near delicate components like the ultrasonic plate.
After cleaning, rinse the tank thoroughly with clean water to remove all soap residue. Any leftover soap can affect the diffuser’s performance or alter the scent of essential oils.
Dry the tank completely before using the diffuser again.
cleaning with rubbing alcohol
Rubbing alcohol is another effective alternative for cleaning diffusers without vinegar. It helps break down oil residue and disinfect the device.
Apply a small amount of rubbing alcohol to a cotton swab or soft cloth. Gently wipe the ultrasonic plate and other areas where residue is present.
This method is especially useful for removing stubborn buildup that soap and water may not fully eliminate. Alcohol evaporates quickly, leaving no strong odor behind.
Use this method sparingly and ensure the diffuser is unplugged before cleaning.
using hydrogen peroxide solution
Hydrogen peroxide is a mild disinfectant that can be used to clean diffusers without vinegar. It helps remove bacteria and buildup while being gentle on most surfaces.
Mix a small amount of hydrogen peroxide with water and pour it into the diffuser tank. Let the solution sit for a few minutes to break down residue.
Afterward, wipe the tank with a soft cloth and rinse thoroughly with clean water. Ensure that all traces of the solution are removed before drying.
This method is particularly useful for maintaining hygiene and preventing microbial growth inside the diffuser.
cleaning hard to reach areas
Diffusers often have small corners, edges, and components that are difficult to clean with a cloth alone. Proper cleaning of these areas ensures complete maintenance.
Cotton swabs or soft brushes can be used to reach tight spaces. Dip the swab in water, alcohol, or a mild cleaning solution and gently clean these areas.
Pay special attention to the ultrasonic plate, as buildup here can directly affect the diffuser’s performance. Clean it carefully to avoid damage.
Taking the time to clean hard-to-reach areas ensures thorough cleaning and better functionality.
removing stubborn oil buildup
Essential oils can sometimes leave a sticky or stubborn residue inside the diffuser. Removing this buildup requires a bit more effort.
Using warm water combined with a few drops of mild soap can help loosen the residue. Let the solution sit longer if needed.
For particularly stubborn spots, rubbing alcohol applied with a cotton swab can break down the oil effectively. Gently wipe until the residue is removed.
Avoid using sharp tools or abrasive materials, as they can damage the diffuser’s interior.
drying the diffuser properly
Proper drying is an important step after cleaning. Moisture left inside the diffuser can lead to mold, bacteria growth, or unpleasant odors.
After rinsing, use a clean, dry cloth to wipe the tank and components. Allow the diffuser to air dry in a well-ventilated area.
Ensure that all parts are completely dry before reassembling or using the diffuser. This helps maintain hygiene and prevents future issues.
establishing a regular cleaning routine
Consistency is key to keeping your diffuser in good condition. Establishing a regular cleaning routine prevents buildup and extends the life of the device.
Light cleaning after each use and deeper cleaning once a week is usually sufficient for most users. If the diffuser is used frequently, more frequent cleaning may be required.
Regular maintenance ensures that the diffuser continues to produce a consistent mist and pleasant aroma.
common mistakes to avoid
There are several common mistakes to avoid when cleaning a diffuser. Using harsh chemicals can damage the device and affect its performance.
Overfilling the tank with water or cleaning solutions can also cause problems. Always follow the recommended levels.
Scrubbing too hard or using abrasive tools can scratch or damage internal components. Gentle cleaning is always more effective.
Ignoring regular cleaning can lead to heavy buildup, making the process more difficult and reducing the diffuser’s efficiency.
Avoiding these mistakes helps maintain the quality and functionality of the diffuser.
maintaining diffuser performance
Keeping your diffuser clean directly impacts its performance. A clean diffuser produces a consistent mist and allows essential oils to disperse effectively.
Using clean water and high-quality oils can also reduce residue buildup. Emptying the tank after each use prevents stagnant water and odors.
Proper maintenance not only improves performance but also extends the lifespan of the diffuser.
conclusion
Cleaning a diffuser without vinegar is entirely possible using simple and effective alternatives such as mild soap, rubbing alcohol, and hydrogen peroxide. These methods remove oil residue, maintain hygiene, and ensure that the diffuser operates efficiently without leaving behind strong odors.
By understanding how diffusers work and following proper cleaning techniques, you can keep your device in excellent condition. Regular cleaning, careful handling, and proper drying are essential for maintaining performance and longevity.
With consistent care and the right approach, your diffuser can continue to provide a refreshing and pleasant atmosphere for a long time.
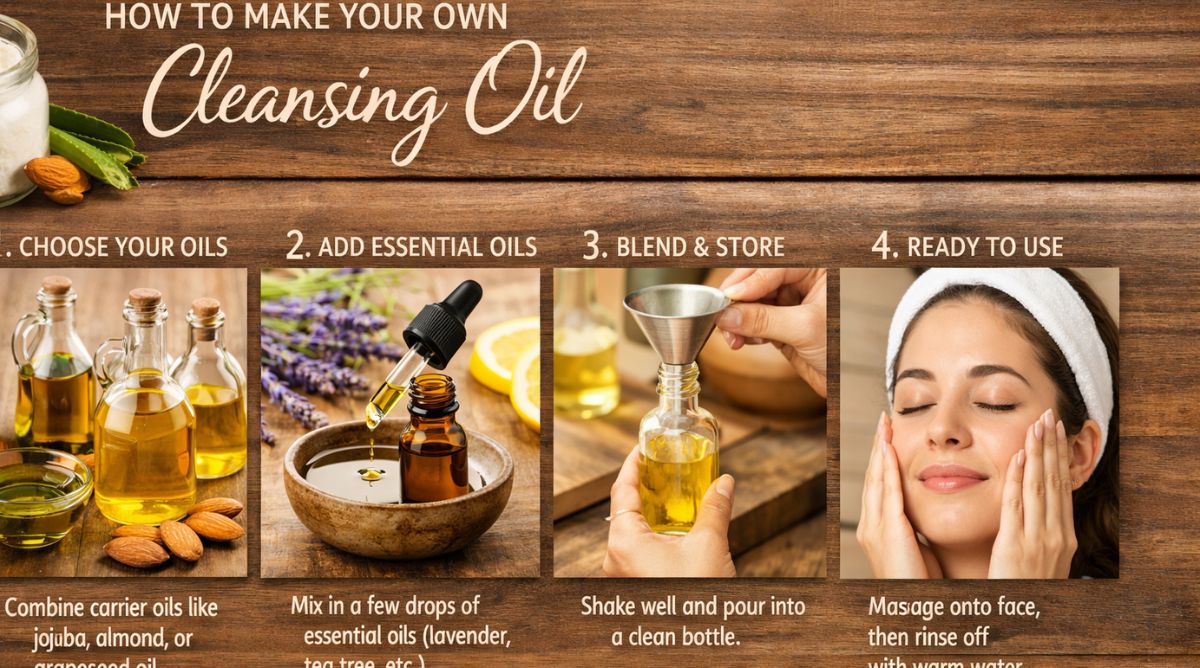
How to make your own cleansing oil is a popular question among skincare enthusiasts who want a natural, customizable, and cost-effective alternative to commercial facial cleansers. Cleansing oil has become a widely respected method for removing makeup, sunscreen, excess sebum, and daily impurities without stripping the skin of its natural moisture barrier. Unlike foaming cleansers that may leave the skin feeling tight or dry, cleansing oils work on the principle that oil dissolves oil, effectively lifting away buildup while maintaining hydration.
Creating your own cleansing oil at home allows you to control ingredients, avoid unnecessary additives, and tailor the formula to your skin type. Whether you have oily, dry, sensitive, or combination skin, understanding how cleansing oils function and how to blend carrier oils properly will help you create a formula that works effectively and safely.
Understanding How Cleansing Oil Works
Before learning how to make your own cleansing oil, it is important to understand the science behind it. The concept is based on the idea that oil binds with oil. Many impurities on the skin, including makeup and sunscreen, are oil-based. When you massage cleansing oil onto your face, it dissolves these substances, allowing them to be rinsed away easily.
When water is added, cleansing oils typically emulsify, meaning they turn milky and rinse off without leaving a heavy residue. This emulsification occurs when an emulsifier is included in the formula. Without an emulsifier, oil may leave a slight film, which some people prefer while others do not.
Cleansing oils are commonly used as the first step in double cleansing, a method popular in Korean skincare routines. In double cleansing, an oil-based cleanser is followed by a gentle water-based cleanser to ensure thorough removal of impurities.
Benefits of Making Your Own Cleansing Oil
There are several advantages to preparing a homemade cleansing oil. First, you can choose high-quality natural oils free from artificial fragrances, preservatives, or harsh chemicals.
Second, homemade cleansing oil can be more affordable than high-end commercial products.
Third, customization allows you to adjust the formula according to seasonal changes or specific skin concerns such as acne, dryness, or sensitivity.
Finally, minimal ingredient formulas reduce the likelihood of irritation for those with reactive skin.
Choosing the Right Carrier Oils
The foundation of how to make your own cleansing oil lies in selecting appropriate carrier oils. Carrier oils serve as the primary cleansing agents and determine how heavy or lightweight the formula feels.
For oily or acne-prone skin, lightweight oils such as jojoba oil or grapeseed oil are commonly recommended. Jojoba oil closely resembles the skin’s natural sebum, making it suitable for balancing oil production.
For dry skin, richer oils like sweet almond oil or avocado oil provide additional nourishment and moisture.
Sensitive skin types may benefit from gentle oils such as sunflower oil, which is generally well tolerated.
Combination skin can benefit from blending two or more oils to create balanced hydration.
Selecting cold-pressed, unrefined oils ensures maximum nutrient retention.
The Role of Emulsifiers
If you want your cleansing oil to rinse clean without leaving residue, adding an emulsifier is recommended. An emulsifier allows oil and water to mix temporarily, creating a milky texture when rinsed.
Common cosmetic emulsifiers include ingredients specifically designed for skincare formulations. These help ensure the oil washes away effectively.
If you prefer a completely natural formula without emulsifiers, you can simply remove excess oil with a warm damp cloth after massaging.
Including an emulsifier typically improves the overall user experience by making the cleansing process smoother and less greasy.
Basic Cleansing Oil Recipe
Understanding how to make your own cleansing oil begins with a simple base formula. A basic cleansing oil can consist of approximately ninety percent carrier oil and ten percent emulsifier.
For example, you may combine jojoba oil as the primary ingredient with a suitable emulsifier according to recommended usage guidelines.
Mix the ingredients in a clean, dry glass bottle. Shake gently to combine.
Store the mixture in a cool, dry place away from direct sunlight.
Always use sterilized containers to prevent contamination.
Customizing for Oily or Acne-Prone Skin
For oily or acne-prone skin, selecting non-comedogenic oils is essential. Jojoba oil, grapeseed oil, and hemp seed oil are often considered lightweight and suitable for this skin type.
You may also incorporate a small amount of tea tree essential oil for its antibacterial properties. However, essential oils should be used cautiously and in very low concentrations to avoid irritation.
A suggested ratio might include eighty percent lightweight carrier oil, ten percent secondary balancing oil, and ten percent emulsifier.
Always perform a patch test before applying the product to your entire face.
Customizing for Dry or Mature Skin
Dry or mature skin benefits from nourishing oils rich in fatty acids and antioxidants. Sweet almond oil, rosehip oil, and avocado oil are popular choices.
Rosehip oil, in particular, is valued for its potential skin-rejuvenating properties.
A blend might consist of seventy percent sweet almond oil, twenty percent rosehip oil, and ten percent emulsifier.
This combination provides hydration while effectively dissolving makeup and impurities.
Customizing for Sensitive Skin
Sensitive skin requires extra caution when formulating cleansing oil. Stick to minimal ingredients and avoid strong essential oils.
Sunflower oil or jojoba oil can serve as gentle bases.
Keep the formula simple with a single carrier oil and emulsifier.
Patch testing is especially important for sensitive skin types.
If redness or irritation occurs, discontinue use immediately.
Proper Application Technique
Knowing how to make your own cleansing oil is only part of the process. Proper application ensures effectiveness.
Begin with dry hands and a dry face. Dispense a small amount of cleansing oil into your palms.
Massage gently onto the face in circular motions for about one minute. Focus on areas with heavy makeup or sunscreen.
Add a small amount of lukewarm water to emulsify the oil. Continue massaging as it turns milky.
Rinse thoroughly with lukewarm water.
If desired, follow with a mild water-based cleanser for double cleansing.
Pat the skin dry with a clean towel.
Storage and Shelf Life
Homemade cleansing oils typically have a shelf life determined by the stability of the carrier oils used. Most carrier oils last between six months to one year when stored properly.
Keep the bottle tightly sealed and away from heat and sunlight.
If the oil develops an unusual odor or changes color significantly, discard it.
Adding vitamin E oil may help extend shelf life slightly by acting as an antioxidant.
Always use clean hands or a pump dispenser to minimize contamination.
Safety Precautions
Always perform a patch test before using a new formula.
Avoid contact with eyes.
Use high-quality cosmetic-grade ingredients.
Do not ingest the product.
Pregnant individuals should consult healthcare professionals before using essential oils.
Maintaining hygiene during preparation is crucial to prevent bacterial growth.
Comparing Homemade and Commercial Cleansing Oils
Commercial cleansing oils often contain stabilizers, preservatives, and fragrance components for extended shelf life and sensory appeal.
Homemade versions offer simplicity and transparency of ingredients.
While commercial products may provide advanced formulations, homemade cleansing oils provide affordability and customization.
Both options can be effective when used correctly.
Environmental Considerations
Making your own cleansing oil can reduce packaging waste.
Reusable glass bottles are eco-friendly alternatives to plastic containers.
Choosing sustainably sourced oils supports environmental responsibility.
Minimalist formulations also reduce chemical runoff into water systems.
Final Thoughts
Understanding how to make your own cleansing oil empowers you to create a skincare product tailored specifically to your needs. By selecting appropriate carrier oils, incorporating emulsifiers if desired, and practicing proper hygiene during preparation, you can develop a gentle and effective cleanser suitable for daily use.
Homemade cleansing oil offers flexibility, cost savings, and ingredient transparency. Whether your skin is oily, dry, sensitive, or combination, customization allows you to achieve balanced cleansing without compromising your skin’s natural barrier.
With careful ingredient selection, safe preparation, and consistent application, making your own cleansing oil can become a valuable and rewarding addition to your skincare routine.

The skincare and personal care industry has seen significant innovations over the past decades, with products designed to target specific concerns while promoting overall skin health. Among these products, Via Max Sense TZE Active Gel has emerged as a notable solution for individuals seeking targeted care for various skin conditions. This article provides an in-depth look at Via Max Sense TZE Active Gel, including its formulation, applications, benefits, usage instructions, and considerations for optimal results.
Understanding Via Max Sense TZE Active Gel
Via Max Sense TZE Active Gel is formulated to provide a combination of soothing, restorative, and protective properties for the skin. Unlike general moisturizers, this gel is designed to penetrate deeper layers of the skin to deliver active ingredients efficiently. Its gel-based texture allows for quick absorption and reduces surface residue, making it suitable for daily use.
The product is intended for use on affected areas, providing relief and support for the skin’s natural recovery processes. It has gained recognition among users who experience skin irritation, dryness, or sensitivity and require a product that acts gently yet effectively.
Key Ingredients and Formulation
The effectiveness of Via Max Sense TZE Active Gel is largely attributed to its carefully balanced formulation. While the exact proprietary blend may vary, typical components include:
- Hydrating Agents: Ingredients that maintain moisture balance and prevent dryness.
- Anti-Inflammatory Compounds: Components that soothe irritation, redness, and discomfort.
- Skin Barrier Support Elements: Substances that strengthen the skin’s protective layer, reducing vulnerability to external aggressors.
- Antioxidants: Molecules that protect the skin from oxidative stress and premature aging.
The combination of these ingredients ensures that the gel addresses multiple concerns simultaneously while remaining gentle on the skin.
Primary Uses and Applications
Via Max Sense TZE Active Gel is versatile and can be used for a variety of purposes:
- Daily Moisturization: Provides hydration without leaving a greasy residue.
- Soothing Irritation: Helps calm inflamed or sensitive skin caused by environmental factors, friction, or mild reactions.
- Support for Minor Skin Conditions: Assists in managing dry patches, redness, or discomfort related to conditions such as eczema or dermatitis.
- Post-Treatment Care: Can be applied after dermatological procedures to support healing and reduce inflammation.
Its multifunctional properties make it suitable for users with diverse skincare needs.
How the Gel Works
The gel’s mode of action involves several mechanisms:
- Penetration of Active Ingredients: The gel texture allows active compounds to reach deeper layers of the skin efficiently.
- Moisture Retention: Hydrating agents create a protective layer that reduces transepidermal water loss.
- Barrier Restoration: Skin-supporting compounds help repair microdamage to the protective barrier, enhancing resilience.
- Soothing and Cooling Effect: The gel’s consistency provides a calming effect upon application, reducing discomfort and irritation.
Through these mechanisms, the gel provides both immediate relief and long-term skin support.
Benefits of Using Via Max Sense TZE Active Gel
Regular use of Via Max Sense TZE Active Gel offers several benefits:
- Enhanced Skin Hydration: Consistent moisture helps maintain soft, smooth, and supple skin.
- Reduced Redness and Irritation: Anti-inflammatory ingredients alleviate discomfort associated with sensitive or reactive skin.
- Improved Skin Barrier Function: Strengthening the barrier reduces susceptibility to irritants, allergens, and environmental stressors.
- Support for Skin Health: Antioxidant components help prevent oxidative damage, supporting long-term skin vitality.
- Fast Absorption: The gel’s lightweight formulation ensures rapid penetration without greasy residue, making it suitable for various daily routines.
These benefits collectively contribute to healthier, more resilient skin.
Application Guidelines
Proper application is essential for maximizing the gel’s effectiveness:
- Cleanse the Area: Begin with a gentle cleansing routine to remove dirt, oils, or makeup.
- Apply a Thin Layer: A small amount of gel is sufficient; applying more does not necessarily enhance results.
- Massage Gently: Using fingertips, massage the gel in circular motions until fully absorbed.
- Frequency: Depending on the level of irritation or dryness, the gel can be applied one to three times daily.
- Follow With Additional Care if Needed: For extremely dry areas, combining the gel with other moisturizers may enhance hydration.
Consistency in application is key to achieving noticeable improvements.
Safety and Considerations
Via Max Sense TZE Active Gel is designed for gentle use, but some considerations are important:
- Patch Test: New users should apply a small amount on a discrete area to check for potential reactions.
- Avoid Open Wounds: The gel is intended for intact skin; do not apply on deep cuts, abrasions, or infected areas.
- Allergen Awareness: Review the ingredient list to avoid known allergens.
- Consultation for Serious Skin Conditions: Individuals with chronic or severe dermatological conditions should consult a healthcare professional before use.
By observing these precautions, users can minimize the risk of adverse effects.
Suitable Skin Types
The gel is generally suitable for a wide range of skin types:
- Dry Skin: Provides hydration and relief from rough, flaky patches.
- Sensitive Skin: Gentle formulation reduces irritation risk.
- Combination Skin: Lightweight gel consistency avoids overburdening oily areas.
- Mature Skin: Supports barrier function and antioxidant defense.
Its versatility allows inclusion in most daily skincare routines.
Environmental and Lifestyle Factors
The effectiveness of the gel can be influenced by external factors:
- Climate: In extremely dry or cold climates, additional moisturization may be required.
- Exposure to Irritants: Frequent contact with chemicals, harsh soaps, or allergens may necessitate more frequent application.
- Sun Exposure: While the gel supports skin health, using additional sun protection is essential to prevent UV-induced damage.
- Stress and Lifestyle: Adequate hydration, nutrition, and rest complement the gel’s benefits.
Understanding these factors helps users tailor their routine for optimal results.
Integration Into Daily Skincare Routine
Via Max Sense TZE Active Gel can be incorporated seamlessly into daily routines:
- Morning Routine: Apply after cleansing and before sunscreen to maintain hydration throughout the day.
- Evening Routine: Use after cleansing to support overnight repair and barrier recovery.
- Targeted Care: Apply directly to areas experiencing irritation, redness, or dryness for focused treatment.
Its lightweight texture makes it compatible with other skincare products.
Common Misconceptions
Some users may misunderstand the gel’s purpose:
- Not a Steroid Cream: The gel is not a medicated corticosteroid and is intended for general soothing and barrier support.
- Does Not Replace Comprehensive Treatment: For severe dermatological conditions, the gel should complement, not replace, professional medical treatment.
- Immediate Results Vary: While the gel provides instant relief, significant improvement in barrier function or chronic dryness may take days to weeks.
Educating users on realistic expectations ensures proper usage.
Community Feedback and User Experiences
Many users report positive experiences:
- Hydration Improvement: Noticeable increase in skin softness and elasticity.
- Reduction in Discomfort: Users report less irritation, redness, and itching.
- Non-Greasy Formula: Appreciation for the lightweight and absorbent texture.
- Complementary Use: Works well in combination with other skincare products without causing pilling or residue.
Community feedback highlights both the practical benefits and ease of use.
Storage and Shelf Life
Proper storage ensures product integrity:
- Cool, Dry Place: Avoid heat and direct sunlight.
- Seal Tightly: Prevent contamination by keeping the container closed.
- Shelf Life: Generally maintains effectiveness for a specified period after opening; check product labeling for exact duration.
Following these guidelines preserves efficacy and safety.
Potential for Professional Use
While primarily for personal care, the gel is also suitable in professional settings:
- Dermatology Clinics: Can be recommended for patients with mild irritation or dryness.
- Aesthetic Treatments: Supports skin recovery post-procedure.
- Massage and Spa Applications: Provides smooth glide while delivering skin-soothing benefits.
Its versatility makes it appealing for both consumer and professional contexts.
Conclusion
Via Max Sense TZE Active Gel represents a thoughtfully formulated solution for maintaining skin hydration, soothing irritation, and supporting overall skin barrier health. Its gel-based texture, blend of hydrating and anti-inflammatory ingredients, and versatility make it suitable for a broad range of skin types and conditions.
By understanding proper application, usage frequency, and environmental considerations, users can maximize the gel’s benefits, achieving healthier, more resilient skin. Whether incorporated into a daily skincare routine, used for targeted relief, or recommended by professionals, Via Max Sense TZE Active Gel offers a reliable, gentle, and effective approach to modern skincare.

how to clean diffuser without vinegar

how to clean granite before sealing

how to clean sofa cushion covers
Can You Rent a Storage Unit for a Month?
How to Adjust U-Haul Mirrors for Safe Driving
How to Cancel a Storage Unit Rental
-

 Food2 weeks ago
how to make fruit and veggie wash
-

 Cleaning2 weeks ago
how to make scent beads for laundry
-

 Cleaning2 weeks ago
how to make bath towels soft again
-

 Beauty1 week ago
How to disassemble cosmetics once human
-
 Cleaning2 weeks ago
how to keep towels soft when line drying
-

 Automotive2 weeks ago
how to install a duralast fuel filter ff831dl
-

 Blog1 week ago
how to edit 100s on 404 skin osu
-

 Technology1 week ago
how to enable ebpf in kernel in openwrt