
Home Improvement
how tight do i need to torque my echelon screws

Properly torquing Echelon screws is essential to ensure mechanical stability, safety, and longevity of equipment. Echelon screws are commonly used in various applications, including industrial machinery, electronics assembly, and structural installations. Applying the correct torque prevents issues like component loosening, material deformation, or failure of the threaded connection. how tight Echelon screws need to be torqued, factors affecting torque requirements, tools to use, step-by-step instructions, and maintenance best practices.
understanding torque
Torque is the rotational force applied to a screw or bolt to achieve a secure connection without over-tightening. It is measured in units such as Newton-meters (Nm) or foot-pounds (ft-lb). Proper torque ensures:
- Mechanical Integrity: Prevents the screw from loosening due to vibrations or operational stress.
- Load Distribution: Ensures that pressure is evenly distributed along the threads and connected surfaces.
- Component Protection: Prevents stripping, cracking, or deformation of the screw or the material it fastens.
- Safety: Reduces the risk of structural failure in critical assemblies.
Understanding torque is the first step in determining how tight Echelon screws should be.
factors affecting torque requirements
Several factors influence the torque needed for Echelon screws:
- Screw Size and Thread Type: Larger diameter screws or fine threads typically require higher torque than smaller screws.
- Material of Screws and Mating Components: Steel, aluminum, or plastic materials have different strength and yield characteristics.
- Lubrication: Lubricated threads reduce friction, allowing the screw to achieve the same clamping force with less torque.
- Application and Load: Screws under high mechanical stress or vibration may require higher torque for secure fastening.
- Environmental Conditions: Exposure to heat, moisture, or chemicals can affect thread friction and torque retention.
Considering these factors is crucial when setting the torque specification for your Echelon screws.
recommended torque specifications
Manufacturers typically provide torque specifications for Echelon screws, often in technical manuals or datasheets. If specific values are unavailable, standard torque ranges based on screw size and material can be used as guidelines. For instance:
- M3 Screws: 0.5–1.0 Nm
- M4 Screws: 1.5–2.5 Nm
- M5 Screws: 2.5–4.5 Nm
- M6 Screws: 5–7 Nm
Always consult the Echelon screw datasheet to ensure compliance with recommended torque. Applying torque outside the recommended range can lead to under-tightening or over-tightening, both of which may compromise performance.
tools for torquing echelon screws
Using the correct tools ensures accuracy and repeatability when torquing Echelon screws:
- Torque Wrenches: Adjustable wrenches calibrated to measure and apply precise torque values.
- Electronic Torque Drivers: Provide digital torque settings with high precision, ideal for sensitive applications.
- Torque Screwdrivers: Suitable for small screws where hand tools may not provide accurate torque.
- Calibrated Socket Wrenches: Useful for larger Echelon screws in industrial assemblies.
Always verify tool calibration before use to ensure accurate torque application.
step-by-step process to torque echelon screws
- Check Specifications: Refer to the manufacturer’s datasheet for torque value, screw size, and material compatibility.
- Prepare Components: Ensure screws and threaded holes are clean and free from debris. Lubricate threads if recommended.
- Set Torque Tool: Adjust the torque wrench or screwdriver to the desired torque value.
- Insert Screw: Hand-tighten the screw to seat it properly before applying final torque.
- Apply Torque: Gradually tighten the screw until the torque tool indicates the target value has been reached. Avoid jerking or sudden force.
- Verify Tightness: Check all screws in the assembly for consistency, especially in multi-screw setups where torque distribution is critical.
- Recheck After Use: In high-vibration environments, inspect and re-torque screws periodically to maintain secure fastening.
Following a systematic approach prevents errors and ensures optimal screw performance.
common mistakes when torquing screws
Improper torquing can cause multiple issues:
- Over-Torquing: Can strip threads, break screws, or deform components.
- Under-Torquing: Leads to loose connections, increased vibration, and eventual failure.
- Uneven Torque: Applying inconsistent torque in multi-screw assemblies can cause stress concentration and warping.
- Ignoring Lubrication: Dry or dirty threads can result in incorrect torque readings and uneven clamping force.
- Using Uncalibrated Tools: Results in inaccurate torque application, risking structural integrity.
Avoiding these mistakes is essential for safe and effective use of Echelon screws.
maintenance and re-torquing
Regular maintenance ensures long-term reliability:
- Periodic Inspection: Check screws for loosening, corrosion, or damage.
- Re-Torquing Schedule: Depending on application, re-torque screws after initial installation and periodically thereafter.
- Replacement: Replace worn or damaged screws immediately to maintain structural integrity.
- Documentation: Record torque values, inspection dates, and maintenance activities for critical assemblies.
Proper maintenance prolongs the life of your equipment and prevents costly failures.
conclusion
Knowing how tight to torque your Echelon screws is essential for maintaining safety, reliability, and performance. Factors such as screw size, material, lubrication, and application type influence the appropriate torque. Using proper tools, following manufacturer guidelines, and adhering to systematic torquing procedures ensures optimal fastening. Avoiding common mistakes and performing regular maintenance will keep Echelon screws secure and functioning correctly over time. By carefully applying the correct torque, users can maximize the durability and effectiveness of their assemblies while minimizing the risk of mechanical failure.

Plumbing issues can arise at any time, often without warning, and they can quickly become stressful if not handled properly. Whether it is a leaking pipe, a clogged drain, or a malfunctioning water heater, knowing how to call a plumber and ask for help is an essential skill for homeowners and tenants alike. Making the right call in a clear and organized manner ensures that you receive timely assistance and that the plumber understands your situation accurately.
Calling a plumber may seem simple, but it involves more than just dialing a number and describing a problem. Effective communication, preparation, and understanding of your issue can make the entire process smoother and more efficient. By following a structured approach, you can save time, avoid misunderstandings, and ensure that the plumber arrives prepared to fix the issue.
This guide provides a comprehensive explanation of how to call a plumber and ask for help, covering everything from preparation to follow-up.
understanding your plumbing problem
Before calling a plumber, it is important to have a basic understanding of the issue you are facing. You do not need to be an expert, but being able to describe the problem clearly will help the plumber assess the situation.
Identify the location of the problem, such as the kitchen sink, bathroom, or outdoor pipes. Observe what is happening, whether it is leaking, blockage, unusual noise, or lack of water flow.
Try to determine when the problem started and whether it has worsened over time. This information can provide valuable context to the plumber.
Having a clear idea of the issue allows you to communicate effectively during the call.
gathering necessary information before calling
Preparation is key when contacting a plumber. Before making the call, gather all relevant details about your plumbing system and the issue.
Make note of your address and contact information so you can provide it quickly. Check if you have any details about your plumbing system, such as the type of fixtures or appliances involved.
If possible, take note of any previous repairs or ongoing issues. This information can help the plumber understand the history of the problem.
Being prepared ensures that the conversation is smooth and efficient.
finding a reliable plumber
Choosing the right plumber is an important step. Look for professionals with good reviews, proper licensing, and experience in handling similar issues.
You may ask for recommendations from friends or neighbors or search for local services in your area. Checking credentials and reputation helps ensure quality service.
Having a reliable plumber increases the chances of resolving the issue effectively and safely.
making the initial call
When you call a plumber, start by introducing yourself and clearly stating that you need assistance. Speak politely and calmly to create a positive interaction.
Explain your problem in simple terms, focusing on the key details. Avoid using overly technical language unless you are confident about it.
Provide information about the location and urgency of the issue. If it is an emergency, make that clear so the plumber can prioritize your request.
A clear and respectful approach sets the tone for effective communication.
describing the problem clearly
Accurate description is one of the most important parts of the call. The plumber relies on your explanation to understand the issue and prepare accordingly.
Describe what you see, hear, or experience. For example, mention if water is leaking continuously, if a drain is completely blocked, or if there is a strange odor.
Include details such as the severity of the problem and any temporary measures you have taken. This helps the plumber assess the situation more accurately.
Clear communication reduces the chances of misunderstandings.
asking important questions
During the call, it is important to ask relevant questions to ensure clarity and transparency. Ask about the plumber’s availability and estimated arrival time.
Inquire about the cost of the service, including any call-out fees or hourly rates. While exact costs may not always be provided, a general estimate can be helpful.
You may also ask about the tools or parts that might be required for the job. This ensures that the plumber comes prepared.
Asking questions helps you make informed decisions.
discussing urgency and scheduling
Not all plumbing issues require immediate attention, but some situations, such as major leaks or burst pipes, need urgent action.
Clearly communicate the urgency of your problem. If it is an emergency, request immediate assistance. For less urgent issues, schedule a convenient time for the visit.
Confirm the appointment details, including the date and time. This ensures that both you and the plumber are on the same page.
Proper scheduling helps avoid delays and confusion.
providing accurate location details
Giving the correct address and directions is essential for a smooth visit. Provide clear and complete location details, including any landmarks if necessary.
If your property is difficult to find, offer additional guidance to help the plumber reach you بسهولة. This saves time and ensures a timely response.
Accurate location information is crucial for efficient service.
preparing your home for the visit
After the call, prepare your home for the plumber’s arrival. Clear the area around the problem to provide easy access.
Remove any items that may obstruct the plumber’s work. This allows them to start the job immediately without delays.
If the issue involves water, consider turning off the main water supply if it is safe to do so. This can help prevent further damage.
Preparation ensures that the repair process is efficient.
communicating during the visit
When the plumber arrives, communicate openly and provide any additional details that may be helpful. Show them the problem area and explain what you observed.
Listen to their assessment and ask questions if needed. Understanding the issue and the proposed solution helps you stay informed.
Good communication during the visit ensures that the problem is addressed correctly.
understanding the repair process
Ask the plumber to explain the repair process and the steps involved. This helps you understand what is being done and why.
Inquire about the time required to complete the repair and any potential challenges. This allows you to plan accordingly.
Understanding the process builds trust and ensures transparency.
discussing costs and payment
Before the work begins, confirm the cost of the service. Ask for a breakdown of charges if possible.
Understand the payment methods accepted and any additional fees that may apply. This prevents surprises later.
Clear discussion about costs ensures a smooth transaction.
following up after the service
After the repair is completed, check that the issue has been resolved. Test the affected area to ensure proper functioning.
If you notice any problems, inform the plumber immediately. Most professionals are willing to address concerns promptly.
Keep records of the service, including receipts and details of the repair. This can be useful for future reference.
Following up ensures that the problem is fully resolved.
building a long term relationship
Finding a reliable plumber is valuable for future needs. If you are satisfied with the service, consider using the same professional for future issues.
Building a long-term relationship ensures consistent quality and faster response times.
Trustworthy professionals can also provide advice on maintaining your plumbing system.
conclusion
Knowing how to call a plumber and ask for help is an important skill that can save time, reduce stress, and ensure effective problem resolution. By understanding your issue, preparing relevant information, and communicating clearly, you can make the process smooth and efficient.
From the initial call to follow-up, each step plays a role in achieving a successful outcome. Asking the right questions, confirming details, and maintaining open communication ensures that your plumbing issue is handled professionally.
With the right approach, you can confidently handle plumbing emergencies and routine repairs, ensuring the safety and functionality of your home.

Granite is one of the most popular natural stone materials used in homes, especially for countertops, floors, and other surfaces. It is valued for its durability, elegant appearance, and resistance to heat and scratches. However, despite its strength, granite is a porous material, which means it can absorb liquids, stains, and bacteria if it is not properly sealed. Before applying a sealant, it is essential to thoroughly clean the granite surface to ensure the best results.
Cleaning granite before sealing is not just a simple wipe-down process. It requires careful preparation, proper cleaning techniques, and attention to detail to remove dirt, grease, stains, and residues that may interfere with the sealing process. If the surface is not properly cleaned, the sealant may not bond effectively, reducing its ability to protect the stone.
Understanding the correct method for cleaning granite before sealing helps preserve its natural beauty, enhance its longevity, and ensure that the sealing process is effective.
understanding granite as a natural stone
Granite is a natural stone formed under high pressure and heat over millions of years. It is composed mainly of minerals such as quartz, feldspar, and mica, which give it its unique patterns and colors.
Although granite is hard and durable, it is not completely non-porous. Tiny pores on the surface can absorb liquids, oils, and contaminants. This is why sealing is necessary to protect the stone from stains and damage.
Before sealing, these pores must be clean and free from any substances. Dirt, grease, soap residue, or old sealant can block the pores and prevent the new sealant from penetrating properly.
Understanding the nature of granite helps explain why proper cleaning is a critical step before sealing.
importance of cleaning before sealing
Cleaning granite before sealing ensures that the surface is free from contaminants that could interfere with the sealant. If dirt or residue remains on the surface, it can become trapped under the sealant, leading to discoloration or uneven protection.
A clean surface allows the sealant to penetrate deeply into the stone, providing better protection against stains and moisture. This improves the effectiveness and durability of the seal.
Proper cleaning also enhances the natural appearance of granite. Removing grime and buildup restores its shine and color, making the final result more visually appealing.
Skipping or rushing the cleaning process can lead to poor sealing results and may require rework later.
gathering the right cleaning materials
Using the correct materials is essential for safely cleaning granite. Harsh chemicals or abrasive tools can damage the surface and reduce its quality.
A pH-neutral granite cleaner is one of the best options because it is specifically designed for natural stone. Mild dish soap mixed with warm water can also be used as a safe alternative.
Soft microfiber cloths or non-abrasive sponges are ideal for cleaning without scratching the surface. A soft brush can help clean grout lines or textured areas if needed.
Avoid using acidic cleaners such as vinegar or lemon-based solutions, as they can etch the surface and dull the finish.
Having the right materials ensures effective cleaning without causing damage.
initial surface preparation
Before deep cleaning, it is important to prepare the granite surface. Start by removing all items from the area, including appliances, decorations, and any objects placed on the surface.
Wipe away loose dust and debris using a dry microfiber cloth. This step prevents particles from scratching the surface during cleaning.
Inspect the granite for stains, grease spots, or areas with heavy buildup. Identifying problem areas helps focus cleaning efforts where they are most needed.
Proper preparation creates a clean working environment and makes the cleaning process more efficient.
basic cleaning process
The basic cleaning process involves removing everyday dirt and light residue from the granite surface.
Prepare a solution of warm water and a small amount of mild dish soap. Dip a soft cloth into the solution and wring it out to avoid excess moisture.
Wipe the surface gently, working in sections to ensure thorough coverage. Pay attention to edges and corners where dirt may accumulate.
After cleaning, use a separate damp cloth with clean water to remove any soap residue. Residue can interfere with the sealing process if left on the surface.
Finally, dry the granite completely using a clean, dry cloth. Ensuring the surface is dry is important before moving to deeper cleaning steps.
removing grease and oily residue
Granite surfaces, especially in kitchens, often accumulate grease and oily residue from cooking and daily use. These substances can block the stone’s pores and prevent proper sealing.
To remove grease, use a pH-neutral cleaner or a specialized degreaser designed for granite. Apply the cleaner to the surface and let it sit for a short time to break down the grease.
Gently wipe the area with a soft cloth or sponge. Avoid scrubbing too hard, as this can damage the finish.
Rinse the surface thoroughly with clean water and dry it completely. Removing all traces of grease is essential for effective sealing.
treating stains and discoloration
Stains on granite can come from various sources such as food, beverages, oils, or chemicals. These stains must be removed before sealing to ensure a uniform appearance.
For organic stains, a mixture of baking soda and water can be used to create a paste. Apply the paste to the stained area and let it sit for some time before gently wiping it away.
For oil-based stains, a paste made from baking soda and a small amount of water can help draw out the oil from the stone.
After treating stains, rinse the area thoroughly and dry it. Repeat the process if necessary until the stain is removed.
Proper stain removal ensures that the granite looks clean and consistent after sealing.
removing old sealant
If the granite has been sealed previously, it may have remnants of old sealant on the surface. These must be removed before applying a new sealant.
A specialized stone cleaner or sealant remover can be used for this purpose. Follow the instructions carefully to avoid damaging the granite.
Apply the remover and allow it to break down the old sealant. Wipe the surface clean and rinse thoroughly.
Ensuring that the old sealant is completely removed allows the new sealant to bond properly with the stone.
ensuring the surface is completely dry
Drying is a crucial step before sealing granite. Any moisture trapped in the stone can prevent the sealant from penetrating properly.
After cleaning, allow the granite to air dry for several hours. Using a clean, dry cloth can help remove excess moisture, but natural drying ensures that the pores are completely dry.
In humid environments, additional drying time may be required. Ensuring complete dryness improves the effectiveness of the sealant.
final inspection before sealing
Before applying the sealant, perform a final inspection of the granite surface. Check for any remaining dirt, stains, or residue.
Run your hand over the surface to feel for any rough or sticky areas. These may indicate leftover residue that needs further cleaning.
Ensure that the surface is smooth, clean, and completely dry. Taking the time for a final inspection helps avoid issues during sealing.
common mistakes to avoid
There are several common mistakes that can affect the cleaning process. Using acidic cleaners is one of the most common errors, as they can damage granite surfaces.
Applying too much water can also be problematic, as excessive moisture can seep into the stone. Always use a damp cloth rather than soaking the surface.
Skipping the rinsing step can leave residue behind, which may interfere with the sealant. Proper rinsing and drying are essential.
Rushing the process without proper drying or inspection can lead to poor sealing results.
Avoiding these mistakes ensures a successful cleaning and sealing process.
maintaining granite after sealing
Once the granite has been cleaned and sealed, proper maintenance helps preserve its appearance and protection.
Regular cleaning with mild solutions prevents buildup and keeps the surface looking fresh. Avoid using harsh chemicals that can damage the sealant.
Wiping spills immediately reduces the risk of stains. Periodic resealing may be required depending on usage and wear.
Maintaining granite properly extends its lifespan and keeps it looking beautiful.
conclusion
Cleaning granite before sealing is an essential step that ensures the effectiveness of the sealing process and preserves the natural beauty of the stone. By understanding the properties of granite and using the right cleaning methods, it is possible to remove dirt, grease, stains, and old sealant without causing damage.
Proper preparation, thorough cleaning, and complete drying create the ideal conditions for sealing. Taking the time to clean the surface correctly results in better protection, improved appearance, and long-lasting durability.
With careful attention and the right approach, granite surfaces can remain strong, clean, and visually appealing for many years.
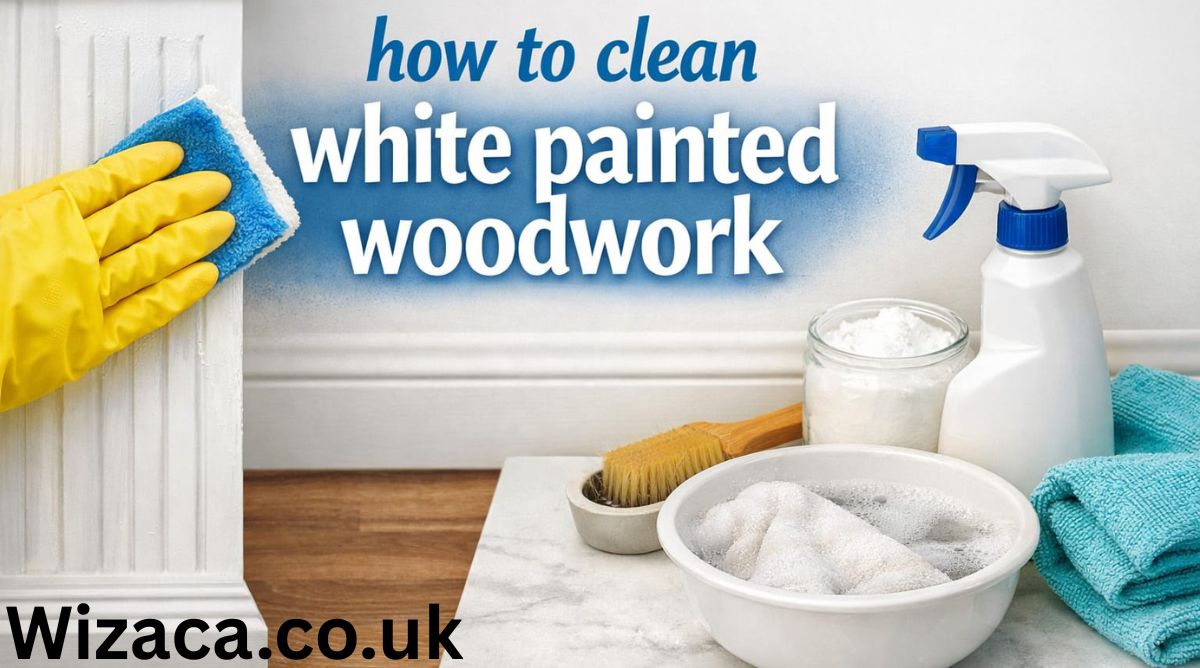
White painted woodwork adds a clean, bright, and elegant look to any home. It is commonly found on doors, trim, baseboards, window frames, cabinets, and furniture. However, while white surfaces look beautiful, they also tend to show dirt, dust, stains, and fingerprints more easily than darker finishes. Over time, white painted woodwork can appear dull or yellowed if not properly maintained. Learning how to clean white painted woodwork correctly helps preserve its appearance and extend its lifespan.
Cleaning painted wood requires a gentle approach because harsh chemicals or abrasive tools can damage the paint. With the right methods and regular maintenance, it is possible to keep white painted surfaces looking fresh and new. This guide explains everything in detail, from basic cleaning techniques to handling stubborn stains and maintaining long-term cleanliness.
understanding white painted surfaces
Before starting the cleaning process, it is important to understand the nature of painted wood surfaces. White painted woodwork is usually coated with either water-based or oil-based paint. Each type of paint has different characteristics that affect how it should be cleaned.
Water-based paints are more common in modern homes. They dry quickly and are easier to clean with mild solutions. Oil-based paints, on the other hand, are more durable but can yellow over time, especially in areas with limited sunlight.
The finish of the paint also matters. Gloss and semi-gloss finishes are more resistant to stains and easier to clean, while matte finishes are more delicate and can be damaged by excessive scrubbing.
Knowing the type of paint and finish helps determine the safest and most effective cleaning method.
basic cleaning routine
Regular cleaning is the best way to keep white painted woodwork in good condition. Dust and light dirt can be removed easily with simple tools and minimal effort.
Start by dusting the surface using a soft cloth, microfiber cloth, or a duster. This removes loose particles that can scratch the paint if rubbed during cleaning.
After dusting, prepare a mild cleaning solution using warm water and a small amount of gentle dish soap. Dip a soft cloth into the solution, wring it out well, and wipe the surface gently.
Work in small sections and avoid soaking the wood, as excessive moisture can damage both the paint and the wood underneath. Once the surface has been cleaned, use a dry cloth to remove any remaining moisture.
This basic routine can be done regularly to maintain cleanliness and prevent buildup.
deep cleaning white woodwork
Over time, dirt and grime can accumulate on white painted surfaces, especially in high-traffic areas. Deep cleaning may be required to restore brightness and remove stubborn buildup.
To deep clean, start with the same mild cleaning solution used for regular cleaning. For areas with heavier dirt, slightly increase the concentration of soap, but avoid using strong chemicals.
Use a soft sponge or cloth to gently scrub the surface. Pay attention to corners, edges, and grooves where dirt tends to accumulate. For intricate details, a soft toothbrush can be used to reach tight spaces.
After cleaning, rinse the area with a damp cloth to remove any soap residue. Finish by drying the surface thoroughly.
Deep cleaning should be done occasionally, depending on the level of use and exposure to dirt.
removing stains and marks
White painted woodwork is prone to visible stains such as fingerprints, scuff marks, and grease. Removing these marks requires a careful approach to avoid damaging the paint.
For light stains, a damp cloth with mild soap is usually sufficient. Gently rub the affected area until the stain is removed.
For tougher marks, a mixture of baking soda and water can be used to create a mild paste. Apply the paste to the stain and gently rub with a soft cloth. Baking soda acts as a gentle abrasive that helps lift stains without scratching the surface.
Magic eraser-type cleaning pads can also be effective, but they should be used cautiously. These pads are slightly abrasive and may dull the finish if used too aggressively.
Always test any cleaning method on a small, hidden area before applying it to visible surfaces.
dealing with grease and kitchen buildup
Woodwork in kitchens is often exposed to grease and cooking residue, which can create a sticky layer over time. Cleaning this buildup requires slightly stronger methods.
A solution of warm water and a small amount of dish soap designed to cut grease can be effective. Apply the solution with a cloth and gently wipe the surface.
For stubborn grease, a mixture of vinegar and water can help break down residue. Use this solution sparingly and rinse with clean water afterward to prevent any lingering odor.
Avoid using harsh degreasers or strong chemicals, as they can damage the paint and leave streaks.
cleaning mold and mildew
In areas with high humidity, such as bathrooms, white painted woodwork may develop mold or mildew. This not only affects appearance but can also pose health concerns.
To clean mold, use a solution of water and a small amount of vinegar or a mild cleaning agent. Apply the solution to the affected area and gently scrub with a soft brush or cloth.
Ensure proper ventilation during cleaning and allow the surface to dry completely afterward. Keeping the area dry and well-ventilated helps prevent mold from returning.
For severe mold problems, stronger cleaning solutions may be required, but they should be used carefully to avoid damaging the paint.
preventing yellowing
One common issue with white painted woodwork is yellowing over time. This can be caused by factors such as aging paint, lack of sunlight, or exposure to smoke and pollutants.
Regular cleaning helps reduce yellowing by removing dirt and residue that can discolor the surface. Allowing natural light into the room can also help maintain brightness.
If yellowing becomes significant, repainting may be necessary to restore the original appearance. Choosing high-quality paint with resistance to yellowing can help prevent future issues.
maintaining long term cleanliness
Maintaining white painted woodwork requires consistent care and attention. Establishing a regular cleaning schedule helps prevent dirt buildup and keeps surfaces looking fresh.
Wiping down frequently touched areas such as door frames and baseboards on a weekly basis can make a noticeable difference. Monthly deep cleaning can help address areas that accumulate more dirt.
Using protective measures such as door mats and proper ventilation can also reduce the amount of dirt and moisture that reaches wood surfaces.
Consistency is key to maintaining the appearance and durability of painted woodwork.
tools and materials to use
Using the right tools and materials is essential for effective cleaning. Soft microfiber cloths are ideal because they trap dust and dirt without scratching the surface.
Sponges with a non-abrasive surface are also useful for cleaning without damaging the paint. Soft brushes or old toothbrushes can help clean detailed areas.
Mild cleaning solutions such as diluted dish soap are generally safe for most painted surfaces. Avoid using steel wool, harsh scrubbers, or strong chemical cleaners, as they can damage the finish.
Choosing gentle tools ensures that the paint remains intact while achieving a thorough clean.
common mistakes to avoid
There are several common mistakes that can damage white painted woodwork. One of the most frequent errors is using too much water. Excess moisture can seep into the wood and cause swelling or peeling.
Using harsh chemicals is another mistake. Strong cleaners can strip paint, leave discoloration, or create dull patches on the surface.
Scrubbing too hard can also damage the finish, especially on matte or older paint. Gentle cleaning is always more effective and safer.
Ignoring regular maintenance can lead to heavy buildup, making cleaning more difficult over time.
Avoiding these mistakes helps preserve the quality and appearance of the woodwork.
restoring heavily soiled woodwork
In some cases, white painted woodwork may become heavily soiled or damaged. When regular cleaning is not enough, more intensive restoration may be required.
Start by thoroughly cleaning the surface using appropriate methods. If stains or discoloration remain, light sanding may be necessary to remove the top layer of paint.
After sanding, the surface can be repainted to restore its original appearance. Choosing high-quality paint and applying it properly ensures a long-lasting finish.
Restoration should be done carefully to avoid damaging the wood and to achieve a professional result.
conclusion
Cleaning white painted woodwork is an important part of maintaining a clean and attractive home. While white surfaces may show dirt more easily, they can be kept looking bright and fresh with regular care and proper cleaning techniques.
By understanding the type of paint, using gentle cleaning solutions, and avoiding harsh methods, it is possible to remove dirt, stains, and buildup without damaging the surface. Regular maintenance, combined with occasional deep cleaning, helps preserve the beauty and durability of painted woodwork.
With consistent effort and the right approach, white painted wood surfaces can remain clean, vibrant, and visually appealing for many years.

how tight do i need to torque my echelon screws

how to activate karr security systems

how to add autochartist to mt5
How to Adjust U-Haul Mirrors for Safe Driving
Can You Rent a Storage Unit for a Month?

Does Air Have a Mass?
-

 Health6 days ago
how to clean diffuser without vinegar
-

 Home Improvement6 days ago
how to clean granite before sealing
-

 Technology6 days ago
how to delete apps on kyocera 902kc flip phone
-

 Cleaning6 days ago
how to clean sofa cushion covers
-

 General3 days ago
What Is 4842570165? Complete Guide
-

 Home Improvement6 days ago
how to clean white painted woodwork
-

 Technology9 hours ago
how to change cardpop I 82v8 emmc/b to windows 11
-
 Finance8 hours ago
how to add autochartist to mt5