
Technology
Voiply vs Axvoice: A Detailed Comparison of Two Popular VoIP Phone Services

Voice over Internet Protocol services have changed the way people communicate by replacing traditional landlines with internet-based calling. Among the many VoIP providers available today, Voiply and Axvoice are two well-known names that frequently come up when users search for affordable and feature-rich phone solutions. Both services target residential and small business users, but they differ in pricing structure, feature focus, customer experience, and long-term reliability.
helping readers understand how these services differ, where they are similar, and which type of user each service best suits. The discussion is structured to cover all major aspects, from call quality to customer support, without including any external links.
Understanding VoIP Services
VoIP services allow voice communication over an internet connection rather than traditional phone lines. Calls are converted into digital data packets, transmitted over the internet, and converted back into sound at the receiving end. This technology significantly reduces costs and allows providers to offer advanced features that were once only available to large businesses.
Voiply and Axvoice both operate on this technology, but they approach service delivery and customer value in different ways.
Overview of Voiply
Voiply positions itself as a modern VoIP provider with a strong focus on simplicity, transparency, and bundled features. It markets itself primarily toward residential users and small businesses that want unlimited calling with minimal complexity.
Voiply emphasizes straightforward plans, strong call quality, and compatibility with common VoIP hardware. Many users choose Voiply because it attempts to replicate the traditional landline experience while adding modern digital conveniences.
Overview of Axvoice
Axvoice is one of the older VoIP providers and has built its reputation around flexible pricing and customizable plans. Instead of focusing only on unlimited calling, Axvoice allows users to choose between metered and unlimited options.
This flexibility appeals to users who want more control over how they pay for phone usage, particularly those with low calling volume or specific international calling needs.
Pricing Structure Comparison
Pricing is one of the most important factors when choosing a VoIP service.
Voiply typically offers simple pricing tiers with unlimited domestic calling included. Taxes and fees are often bundled into the advertised price, which reduces confusion for users who want predictable monthly bills. This approach is especially appealing to households and small offices that rely heavily on voice communication.
Axvoice, on the other hand, offers both pay-as-you-go plans and unlimited plans. Metered plans can be significantly cheaper for users who make few calls, but costs may rise if call volume increases. This model benefits light users but may require closer monitoring of usage.
In summary, Voiply prioritizes pricing simplicity, while Axvoice prioritizes pricing flexibility.
Call Quality and Reliability
Call quality is a critical factor in evaluating any VoIP service. Poor audio quality, dropped calls, or delays can make even the cheapest service frustrating.
Voiply generally emphasizes high-definition voice quality and consistent performance. Its infrastructure is optimized for stable domestic calling, and users often experience clear audio with minimal latency when using a reliable internet connection.
Axvoice also delivers solid call quality, but because it offers a wider range of plan types, performance can sometimes depend on user configuration and network conditions. Advanced users who fine-tune their setup often report good results, while less technical users may need more guidance.
Both services rely heavily on the quality of the user’s internet connection, router, and VoIP hardware.
Ease of Setup and Installation
Voiply focuses on ease of use, especially for non-technical users. Setup usually involves connecting a VoIP adapter or compatible phone, configuring basic settings, and activating the service. Instructions are designed to be beginner-friendly, making Voiply appealing to users transitioning from traditional landlines.
Axvoice setup can be equally straightforward, but it offers more configuration options. This flexibility can be beneficial for advanced users but may feel overwhelming for beginners. Users who want granular control over codecs, call routing, or device compatibility may appreciate Axvoice’s approach.
Overall, Voiply is better suited for users who want a plug-and-play experience, while Axvoice caters more to users comfortable with technical adjustments.
Feature Comparison
Features play a major role in differentiating VoIP providers.
Voiply typically includes features such as voicemail, voicemail-to-email, call waiting, caller ID, call forwarding, and spam call blocking as part of its standard plans. These features are bundled rather than sold as add-ons, making the service feel comprehensive from the start.
Axvoice offers a broad range of features as well, but some may depend on the chosen plan. Advanced features such as virtual numbers, advanced voicemail settings, or specialized call handling options may be optional or priced separately.
Voiply’s feature model favors simplicity, while Axvoice’s model favors customization.
International Calling Options
International calling is an important consideration for users with family, friends, or business contacts abroad.
Voiply usually includes international calling to select destinations within its plans, with additional options available for broader coverage. The focus is on convenience rather than extensive customization.
Axvoice has long been known for its international calling flexibility. Users can choose specific international plans or pay per minute based on destination. This can be cost-effective for users who regularly call certain countries but do not need unlimited coverage.
For frequent international callers with specific needs, Axvoice may offer more tailored options. For users who want basic international calling included without extra management, Voiply may be more appealing.
Customer Support Experience
Customer support quality can significantly impact user satisfaction, especially during setup or troubleshooting.
Voiply generally emphasizes responsive support and clear communication. Its support approach aims to assist non-technical users quickly, focusing on common issues such as device setup, call quality, and billing questions.
Axvoice also provides customer support, but because its services are more customizable, support interactions may involve more technical discussion. This can be a benefit for advanced users but may feel slower or more complex for beginners.
Both providers recognize the importance of support, but their styles align with their overall service philosophies.
Device Compatibility
Device compatibility is essential for users who already own VoIP hardware or plan to integrate the service with existing systems.
Voiply supports a wide range of VoIP phones and adapters, focusing on popular consumer and small business devices. Compatibility is designed to reduce friction during setup.
Axvoice supports an extensive list of devices and allows for deeper customization. Users who want to integrate softphones, IP phones, or advanced hardware setups may find Axvoice more accommodating.
The choice depends on whether the user values simplicity or extensive device control.
Porting Existing Phone Numbers
Number portability allows users to keep their existing phone number when switching services.
Voiply typically offers a streamlined number porting process, guiding users step by step to minimize downtime. This is especially important for users who want a seamless transition from traditional phone services.
Axvoice also supports number porting, but the process may vary depending on the plan and existing carrier. Users with unusual configurations may need additional coordination.
Both services support number porting, but Voiply emphasizes simplicity, while Axvoice emphasizes flexibility.
Contract Terms and Commitment
Contract flexibility affects long-term satisfaction.
Voiply often markets itself with minimal long-term commitment, allowing users to try the service without being locked into lengthy contracts. This approach builds confidence for new users.
Axvoice offers multiple billing structures, some of which may involve longer-term commitments for better pricing. Users should carefully consider their expected usage before selecting a plan.
Users who prefer freedom and low commitment may favor Voiply, while those willing to commit for tailored pricing may prefer Axvoice.
Security and Privacy Considerations
Security is an often-overlooked aspect of VoIP services.
Voiply generally focuses on protecting user data through encryption and secure infrastructure. Its goal is to provide peace of mind without requiring users to manage security settings themselves.
Axvoice offers security features as well, and advanced users may have more control over encryption protocols and authentication methods.
Both services recognize the importance of protecting calls and user information, but their approaches reflect their target audiences.
Reliability During Power or Internet Issues
VoIP services depend on power and internet connectivity, which can be a concern during outages.
Voiply often includes call forwarding or failover options that redirect calls to mobile numbers if the primary connection is unavailable. This enhances reliability for residential users.
Axvoice also supports failover configurations, especially for users who actively manage their settings.
Reliability depends not only on the provider but also on how users configure backup options.
Target Audience Comparison
Voiply is best suited for users who want:
- Simple pricing
- Minimal setup complexity
- Bundled features
- A traditional phone experience with modern benefits
Axvoice is best suited for users who want:
- Flexible pricing options
- Metered or customized plans
- Advanced configuration control
- Specific international calling setups
Understanding your own usage patterns is key to choosing the right service.
Advantages of Voiply
Voiply’s main strengths include ease of use, predictable pricing, and a feature-rich experience without add-ons. It appeals to users who value convenience and clarity over customization.
Its approach reduces decision fatigue and makes VoIP accessible to a broad audience.
Advantages of Axvoice
Axvoice excels in flexibility and customization. Users who want control over call costs, device settings, and international calling structures often find Axvoice appealing.
Its long-standing presence in the VoIP market adds to its credibility among experienced users.
Potential Drawbacks of Voiply
Some users may find Voiply’s limited customization restrictive. Advanced users who want to fine-tune every aspect of their VoIP setup may feel constrained by its simplified approach.
Potential Drawbacks of Axvoice
Axvoice’s flexibility can also be a downside. New users may find plan selection and configuration more complex, increasing the learning curve.
Final Comparison Summary
Voiply and Axvoice both deliver reliable VoIP services, but they serve different user priorities. Voiply focuses on simplicity, bundled value, and ease of use, making it ideal for households and small offices that want a hassle-free solution. Axvoice focuses on flexibility, customization, and varied pricing models, making it attractive to users with specific calling patterns and technical confidence.
The best choice ultimately depends on whether the user values convenience or control.
Conclusion
Choosing between Voiply and Axvoice is not about which service is universally better, but which aligns more closely with your communication needs. Both providers demonstrate the advantages of VoIP technology, offering cost savings, advanced features, and flexibility compared to traditional phone services.
By understanding their differences in pricing, features, setup, and target audience, users can make informed decisions that enhance their communication experience without unnecessary complexity or expense.
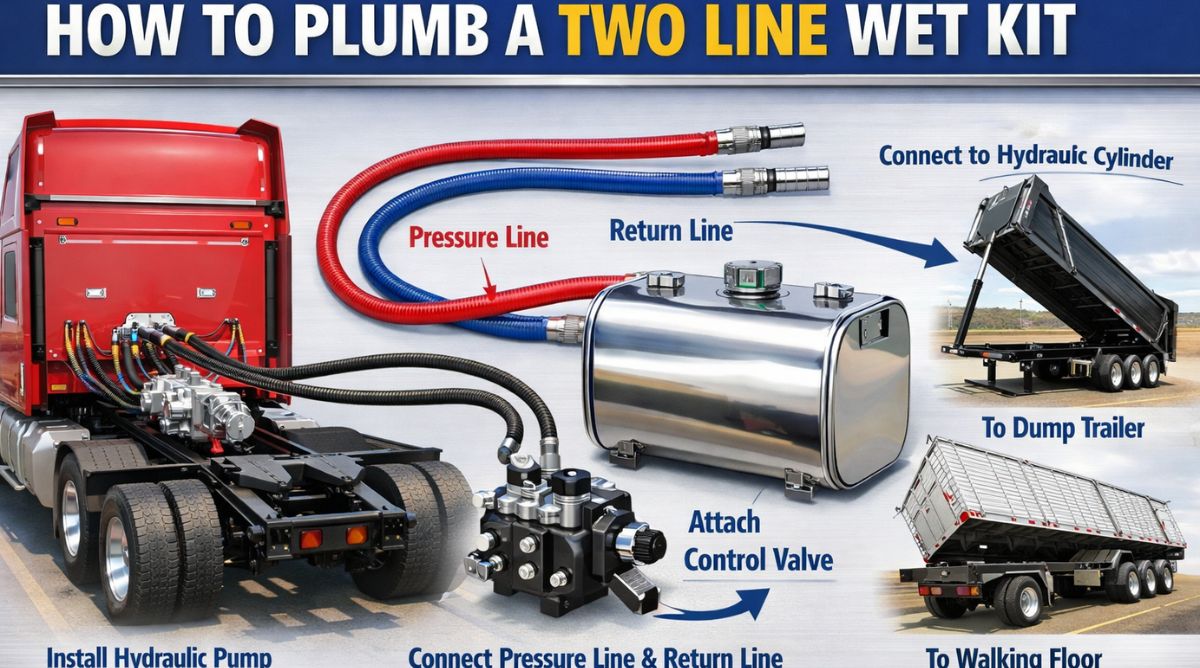
How to plumb a two line wet kit is a common question among truck owners and operators who need hydraulic power for dump trailers, walking floors, live bottoms, or other hydraulic equipment. A two line wet kit is a hydraulic system installed on a truck tractor that supplies pressurized hydraulic fluid to a trailer. It typically consists of a pressure line and a return line, along with a hydraulic pump, reservoir, control valve, and associated fittings and hoses. Proper plumbing of the system is critical to ensure safe operation, long component life, and reliable hydraulic performance.
A two line wet kit differs from a three line system in that it uses one pressure line and one return line between the truck and trailer. In contrast, a three line system adds a dedicated case drain line for certain high-performance applications. Understanding how the two line configuration works is essential before beginning installation.
Understanding the Components of a Two Line Wet Kit
Before plumbing the system, it is important to understand each major component and its function. The hydraulic pump is typically mounted to the truck’s transmission using a power take-off unit. The power take-off transfers mechanical energy from the transmission to drive the pump. The pump then draws hydraulic fluid from the reservoir and sends it under pressure through the system.
The hydraulic reservoir stores the fluid and allows it to cool and de-aerate before recirculation. The control valve regulates fluid flow to the pressure line and directs returning fluid back to the tank. The pressure hose carries high-pressure fluid to the trailer, while the return hose carries used fluid back to the reservoir.
Quick couplers are mounted at the rear of the truck to allow fast connection and disconnection between tractor and trailer. These couplers must be rated for the operating pressure of the system.
Planning the Installation
Proper planning is the first step in how to plumb a two line wet kit. The installer must determine where the hydraulic tank will be mounted, usually on the truck frame rail. Space constraints, exhaust routing, and clearance from suspension components must all be considered.
The pump location depends on the transmission type and the power take-off configuration. Confirm compatibility between the transmission and the PTO unit before installation.
Hose routing must be carefully planned to avoid sharp bends, excessive heat sources, and moving components such as drive shafts or suspension parts. Secure mounting points for clamps and brackets should be identified in advance.
Installing the Hydraulic Reservoir
The reservoir is typically mounted on the side of the truck frame. Use heavy-duty brackets designed to support the weight of the tank when filled with hydraulic fluid. Ensure the mounting hardware is tightened according to manufacturer specifications.
The suction port at the bottom of the tank connects to the inlet of the hydraulic pump. This line must be large enough in diameter to prevent cavitation. Cavitation occurs when the pump does not receive adequate fluid supply, causing air bubbles and potential pump damage.
Install a suction hose rated for hydraulic service. Avoid restrictions in this line, and ensure fittings are properly sealed to prevent air leaks.
Installing the PTO and Hydraulic Pump
After mounting the PTO to the transmission, attach the hydraulic pump securely. The pump inlet connects to the suction line from the reservoir. The outlet of the pump connects to the control valve through a high-pressure hose.
Ensure all fittings are properly torqued. Use thread sealant where recommended, but avoid excessive use that could contaminate the hydraulic system.
Check alignment between the PTO and pump to prevent premature wear. After installation, verify that the PTO engages and disengages smoothly.
Plumbing the Pressure Line
The pressure line carries high-pressure fluid from the control valve to the trailer. This hose must be rated for the maximum operating pressure of the system.
Connect the pump outlet to the inlet port of the control valve. From the valve’s pressure output port, route a hose to the rear of the truck where quick couplers are mounted.
Secure the hose along the truck frame using clamps spaced at regular intervals. Avoid routing near hot exhaust components unless protective heat shielding is used.
At the rear, connect the hose to the pressure-side quick coupler. Labeling the coupler clearly helps prevent incorrect connections.
Plumbing the Return Line
The return line carries fluid back from the trailer to the reservoir. In a two line wet kit, this line is separate from the pressure line and typically enters the tank at a designated return port.
From the rear quick coupler, route the return hose forward along the frame. Connect it to the return port on the control valve or directly to the tank, depending on system design.
Ensure the return line has sufficient diameter to allow unrestricted flow. A restricted return line can cause overheating and increased back pressure.
Install a return line filter if specified by the system manufacturer. This filter removes contaminants before fluid re-enters the tank.
Installing Quick Couplers
Quick couplers are essential for connecting and disconnecting the trailer. Mount them securely to a bracket at the rear of the truck, typically near the frame cross member.
Ensure the pressure and return couplers are clearly marked. Connecting hoses incorrectly can damage hydraulic components.
Check that couplers are compatible with the trailer’s fittings. Standardizing coupler types across equipment reduces confusion and connection issues.
Filling and Priming the System
After plumbing is complete, fill the reservoir with the recommended hydraulic fluid. Consult manufacturer specifications for correct fluid type and viscosity.
Before operating under load, prime the system. Engage the PTO briefly to allow fluid to circulate. Check for leaks at all connections.
Monitor fluid level and add more if necessary. Air trapped in the system may cause temporary noise or jerky operation until fully purged.
Testing the System
Testing is a critical step in how to plumb a two line wet kit. With the trailer connected, engage the PTO and operate the hydraulic equipment slowly.
Observe pressure readings if a gauge is installed. Verify smooth operation and proper function of the control valve.
Check for leaks along hoses and fittings. Even small leaks should be addressed immediately to prevent larger failures.
Monitor fluid temperature during extended operation. Excessive heat may indicate restricted flow or improper hose sizing.
Safety Considerations
Hydraulic systems operate under high pressure and can be dangerous if improperly installed. Always relieve system pressure before disconnecting hoses.
Wear protective gloves and eye protection when working with hydraulic components. High-pressure fluid injection injuries can be severe.
Ensure all hoses are rated for hydraulic service and operating pressure. Never substitute with lower-rated hoses.
Keep hands and clothing away from moving parts when engaging the PTO.
Maintenance After Installation
Regular maintenance ensures long-term reliability. Inspect hoses periodically for signs of wear, cracking, or abrasion.
Check fluid levels routinely and replace filters according to manufacturer recommendations.
Tighten mounting hardware as needed and ensure clamps remain secure.
Keeping the system clean prevents contamination and extends component life.
Common Mistakes to Avoid
One common mistake is using undersized hoses. This restricts flow and increases system heat.
Another mistake is improper hose routing near sharp edges or moving components, leading to premature hose failure.
Failure to properly secure hoses can result in vibration damage.
Incorrectly connecting pressure and return lines at the couplers can cause system malfunction.
Two Line Versus Three Line Systems
Understanding system requirements is important when considering how to plumb a two line wet kit. Two line systems are suitable for many dump and walking floor applications. However, some high-performance hydraulic motors require a dedicated case drain line, which would require a three line setup.
Selecting the correct system configuration ensures compatibility with the intended trailer equipment.
Final Thoughts
Learning how to plumb a two line wet kit requires careful planning, proper component selection, and attention to detail. From mounting the reservoir and pump to routing pressure and return lines, each step plays a critical role in system performance.
By following structured installation procedures, securing hoses properly, verifying connections, and conducting thorough testing, operators can achieve a safe and efficient hydraulic setup. A properly plumbed two line wet kit provides reliable hydraulic power for demanding trailer applications while ensuring durability and long service life.

The WR20BAR G-Shock is one of the most popular models in the G-Shock lineup due to its durability, water resistance, and multifunctional capabilities. One of the key features of this watch is its ability to handle multiple time zones, making it ideal for travelers, business professionals, and anyone who needs to monitor different regions. Setting the Honuras time zone on a WR20BAR G-Shock can be slightly confusing for first-time users because the watch includes multiple modes and adjustment settings. This guide provides a comprehensive step-by-step explanation of how to configure the Honuras time zone accurately on your WR20BAR G-Shock, along with tips for maintaining optimal performance.
Understanding WR20BAR G-Shock Features Relevant to Time Zones
Before diving into the time zone settings, it is important to understand the functionalities of the WR20BAR G-Shock that affect how the watch handles time zones. The WR20BAR designation indicates that the watch has a water resistance rating of 20 bars, equivalent to 200 meters, making it suitable for swimming, snorkeling, and shallow diving. Beyond physical resilience, this watch model includes multiple modes such as Timekeeping, World Time, Alarm, Stopwatch, and Countdown Timer. The World Time mode is essential for setting and viewing the time in different cities or regions, including Honuras, a less commonly featured city in many G-Shock models. Knowing these modes ensures that users do not confuse adjustments and accidentally change other settings.
Accessing the Timekeeping Mode
The first step in setting the Honuras time zone is to enter the correct mode. The WR20BAR G-Shock has a circular dial interface with four buttons typically labeled as Adjust, Mode, Start/Stop, and Split/Reset. To access Timekeeping Mode, press the Mode button repeatedly until the main time display appears. This is the default mode showing the current home time, date, and day of the week. Ensuring you are in Timekeeping Mode is critical because changes to time zones must begin from this mode to sync accurately with the watch’s internal memory.
Entering World Time Mode
After confirming that you are in Timekeeping Mode, the next step is to switch to World Time Mode. Press the Mode button once more to navigate to World Time. The digital display will change to indicate the currently selected city code. On most WR20BAR models, the city code will appear as a three-letter abbreviation, such as NYC for New York or LON for London. Since Honuras may not be a default city in every G-Shock firmware, some users might need to select the closest matching time offset manually. Understanding the city code and corresponding time difference is crucial for accurate configuration.
Selecting Honuras or Corresponding UTC Offset
Once in World Time Mode, you can cycle through the list of available city codes using the Start/Stop or Split/Reset buttons. Look for Honuras in the list. If Honuras is unavailable, identify the correct UTC offset for Honuras, which is generally UTC-6. You can then select a nearby city in the same time zone that matches this offset. Press the Start/Stop button to move forward through the city codes or the Split/Reset button to move backward. Stop when the desired city or UTC offset is displayed. Correct selection at this stage ensures that your watch displays the accurate local time when traveling or monitoring events in Honuras.
Adjusting Daylight Saving Settings
Some regions observe Daylight Saving Time (DST), which shifts the clock by one hour during specific months. Although Honuras does not currently observe DST, it is important to verify the DST settings on the WR20BAR G-Shock to avoid discrepancies. Press and hold the Adjust button until the city code begins flashing. Use the Start/Stop button to toggle DST on or off. Setting DST incorrectly can result in the displayed time being one hour ahead or behind the actual time. Always confirm whether the selected city or UTC offset requires DST adjustments.
Confirming Time Zone Settings
After selecting the city or UTC offset and adjusting DST, press the Adjust button again to save the settings. The digital display will return to World Time Mode, showing the time for Honuras or the closest corresponding city. Double-check the hours and minutes to ensure accuracy. WR20BAR G-Shock watches allow users to view both the home time and the world time simultaneously, making it easy to compare and confirm that the settings are correct. Using this dual-display feature is recommended for travelers who frequently switch between multiple time zones.
Setting Home Time Synchronization
Once World Time Mode is configured, it is essential to synchronize the home time with the selected Honuras time zone if desired. To do this, return to Timekeeping Mode by pressing the Mode button. Press and hold the Adjust button until the home time begins flashing. Use the Start/Stop and Split/Reset buttons to adjust the hours and minutes to match the Honuras time zone exactly. Press the Adjust button again to finalize the setting. This ensures that all alarms, timers, and other time-dependent functions on the watch operate according to the correct local time.
Troubleshooting Common Issues
Many users encounter common issues when setting a time zone on the WR20BAR G-Shock. One frequent problem is the unavailability of Honuras as a direct city code. As mentioned earlier, using the correct UTC offset solves this problem. Another issue is incorrect DST configuration, which can cause the displayed time to be off by one hour. Always verify DST settings before finalizing the adjustment. Finally, ensure that the watch’s battery is sufficiently charged, as low power can prevent successful time updates or cause the watch to revert to default time settings.
Advanced Features Related to Time Zones
The WR20BAR G-Shock includes advanced features that enhance time zone management. For example, some models allow automatic time synchronization via radio signals or GPS, depending on the variant. Enabling this feature ensures that the watch adjusts automatically when traveling to different time zones, including Honuras. Additionally, some watches support 24-hour or 12-hour display formats, which can be changed by holding the Adjust button in Timekeeping Mode and toggling between formats. Choosing the correct display format is important for clarity, especially when managing multiple time zones.
Maintaining Accuracy and Performance
To ensure your WR20BAR G-Shock remains accurate after setting the Honuras time zone, regular maintenance is recommended. Keep the watch clean and avoid exposing it to strong magnetic fields, which can interfere with internal timekeeping mechanisms. Check the time periodically, especially after battery replacement, as the settings may reset. If the watch includes a radio-controlled or GPS time-sync feature, allow it to connect fully to ensure precise time adjustment. Proper care guarantees that your WR20BAR G-Shock continues to provide reliable performance across different regions.
Conclusion
Setting the Honuras time zone on a WR20BAR G-Shock requires careful navigation through Timekeeping and World Time modes, selection of the correct city code or UTC offset, adjustment for DST if necessary, and synchronization of home time. By understanding the functionalities of the WR20BAR G-Shock and following the steps outlined above, users can ensure accurate time display and optimal use of alarms, timers, and other features. Maintaining the watch and verifying time settings regularly further enhances its reliability, making it a valuable companion for anyone needing precise time management in multiple regions. The WR20BAR G-Shock remains an excellent choice for travelers, adventurers, and professionals who require both durability and sophisticated time zone functionality.

Flexographic printing, commonly known as flex printing, is a widely used method for producing high-quality images on a variety of substrates, including paper, plastic, and packaging materials. A critical component in the flex printing process is the printing plate, which directly affects the quality, sharpness, and consistency of printed images. A bad plate can lead to poor print results, increased waste, and higher production costs. Understanding how to identify a bad plate is essential for operators, prepress technicians, and quality control personnel to ensure efficient production and consistent output. This article provides a comprehensive guide on how to tell a bad plate on flex printing, covering inspection techniques, common signs of defects, troubleshooting methods, and preventive measures.
Understanding Flex Printing Plates
Flexographic plates are usually made from photopolymer or rubber materials that carry the image to be printed. The raised image areas on the plate transfer ink onto the substrate, while non-image areas remain ink-free. Plates can vary in thickness, hardness, and surface texture depending on the application, ink type, and substrate.
Flex printing plates are manufactured through a photochemical process, where the image is exposed onto the plate using ultraviolet light, and unexposed areas are washed away. The quality of the plate directly affects ink transfer, registration, and overall print quality. Therefore, identifying a bad plate early in the production process is essential to prevent defects in the final printed product.
Importance of Detecting a Bad Plate
Detecting a bad plate in flex printing has several advantages:
- Consistent Print Quality: Ensures that the printed image is sharp, uniform, and free of defects.
- Reduced Waste: Prevents the production of defective prints, minimizing material and ink waste.
- Cost Efficiency: Avoids the costs associated with reprinting or plate replacement after printing.
- Operational Efficiency: Helps maintain smooth production by avoiding machine downtime due to poor plate performance.
- Customer Satisfaction: Ensures that products meet quality standards and specifications.
Early detection of bad plates is critical because flex printing often involves high-speed production, and errors can propagate rapidly across long print runs.
Common Signs of a Bad Plate
Several visual and performance indicators can signal that a flex printing plate is defective. Operators should be familiar with these signs to quickly identify and address problems.
1. Uneven Ink Transfer
One of the most obvious signs of a bad plate is uneven ink distribution on the substrate. This can manifest as:
- Blotchy or Splotchy Prints: Inconsistent ink density across the printed area.
- Light or Faded Areas: Sections of the image may appear under-inked or faded due to insufficient plate contact.
- Excessive Ink Buildup: Over-inking in certain areas, leading to smudging or bleeding.
Uneven ink transfer can result from plate surface irregularities, improper exposure during plate making, or damage to the plate surface.
2. Image Distortion
A bad plate may produce distorted images, which can include:
- Stretched or Compressed Features: Misaligned or incorrectly proportioned design elements.
- Jagged or Blurry Edges: Loss of sharpness and clarity along lines and edges.
- Ghosting Effects: Faint duplicate images caused by plate deformation or improper mounting.
Image distortion often occurs when plates are uneven, warped, or incorrectly mounted on the printing cylinder.
3. Surface Defects on the Plate
Physical inspection of the plate can reveal defects, including:
- Scratches or Cuts: Damage during handling or storage can cause unwanted marks on the print.
- Air Bubbles or Voids: Trapped air during plate making can create missing image areas.
- Debris or Contaminants: Dust, dirt, or foreign particles embedded in the plate surface.
Surface defects reduce contact between the plate and substrate, leading to inconsistent printing results.
4. Registration Problems
Flex printing often requires precise alignment of multiple colors. A bad plate can result in registration issues such as:
- Color Misalignment: Colors do not overlap correctly, producing halos or off-register effects.
- Shifts in Image Placement: Repeated misplacement of design elements across the print run.
Registration problems may arise from plate shrinkage, warping, or mounting errors, which interfere with precise alignment.
5. Plate Hardness and Flexibility Issues
Flex plates must maintain specific hardness and flexibility to transfer ink correctly. Signs of plate material problems include:
- Excessive Softness: The plate may compress too much under pressure, causing over-inking and smudging.
- Excessive Hardness: Reduced ink transfer and poor adhesion to the substrate.
- Cracks or Brittleness: Plates that crack during mounting or printing are considered defective.
Testing the plate’s material properties can reveal potential issues before production begins.
Inspection Techniques for Bad Plates
Identifying bad plates requires careful inspection using visual, tactile, and test-print methods.
1. Visual Inspection
Examine the plate under proper lighting conditions to detect surface defects, scratches, voids, or dust. Magnification tools or loupe lenses can help identify subtle imperfections that may affect print quality.
2. Tactile Inspection
Gently run fingers over the plate surface to detect unevenness, bumps, or depressions. Tactile examination can complement visual inspection and highlight surface irregularities that are not immediately visible.
3. Test Printing
Performing a test print on a small substrate area helps evaluate plate performance under actual printing conditions. Inspect the print for ink transfer, sharpness, registration, and surface defects. Test printing provides practical confirmation of plate quality.
4. Measurement and Profiling
Advanced inspection may include measuring plate thickness, hardness, and surface profile using specialized tools. Consistency in thickness and surface texture is critical for uniform printing performance.
5. Comparison with Original Artwork
Compare the printed output or plate surface with the original design file. Discrepancies in image reproduction may indicate plate defects or inaccuracies in the plate-making process.
Causes of Bad Plates in Flex Printing
Understanding the root causes of plate defects helps prevent recurring problems.
1. Errors During Plate Making
- Improper exposure to ultraviolet light can result in undercured or overcured areas.
- Incorrect washing or development may leave residual material or erode image details.
- Air bubbles or debris trapped during production can create voids or missing image areas.
2. Handling and Storage Issues
- Rough handling or bending can cause scratches, cracks, or warping.
- Exposure to extreme temperatures or humidity may lead to plate deformation or material degradation.
- Contaminants such as dust, grease, or fingerprints can affect ink transfer.
3. Mounting Errors
- Plates that are mounted unevenly or with improper tension may cause image distortion and registration problems.
- Misalignment on cylinders can result in repeated defects across the print run.
4. Material Defects
- Substandard photopolymer or rubber compounds can produce plates with inconsistent hardness, brittleness, or shrinkage.
- Aging plates may lose flexibility, leading to cracks and poor ink transfer.
Troubleshooting and Correcting Bad Plates
Once a bad plate is identified, corrective measures can prevent defective prints and minimize waste.
Step 1: Isolate the Problem
Determine whether defects are caused by the plate, press setup, ink, or substrate. Test printing with a known good plate can help confirm the source of the issue.
Step 2: Replace or Remake the Plate
If the plate is defective, replace it with a new one or remake it following proper plate-making procedures. Ensure that exposure, washing, and development steps are correctly executed.
Step 3: Adjust Press Parameters
Sometimes minor issues can be corrected by adjusting printing pressure, doctor blade settings, or ink viscosity. These adjustments should be tested cautiously to avoid further defects.
Step 4: Clean and Maintain Equipment
Ensure that the printing cylinder, substrate, and ink system are clean and free of contaminants. Proper maintenance reduces the risk of plate damage and improves print quality.
Step 5: Implement Quality Control Checks
Regular inspection of plates before and during production can detect defects early. Establishing a quality control workflow helps maintain consistent print quality and reduces waste.
Preventive Measures for High-Quality Plates
Prevention is the most effective strategy to avoid bad plates in flex printing.
- Use High-Quality Materials: Choose reputable photopolymer or rubber plates suitable for the application.
- Control Environmental Conditions: Store plates in a controlled environment to prevent warping, moisture absorption, or heat damage.
- Proper Handling: Handle plates with care, avoiding sharp bends, scratches, or contamination.
- Standardize Plate-Making Procedures: Follow consistent exposure, washing, and curing protocols to produce reliable plates.
- Routine Inspections: Implement visual, tactile, and test-print inspections to identify issues before large-scale production.
- Training Operators: Educate operators and technicians on signs of bad plates and proper handling techniques.
Conclusion
Identifying a bad plate in flex printing is critical to maintaining print quality, reducing waste, and ensuring efficient production. Common signs of a bad plate include uneven ink transfer, image distortion, surface defects, registration problems, and material inconsistencies. Effective inspection techniques such as visual checks, tactile assessment, test printing, and measurement can detect defects early. Understanding the causes, including plate-making errors, handling issues, mounting mistakes, and material defects, allows operators to implement corrective and preventive measures.
By following best practices for plate handling, inspection, and maintenance, flex printing operations can minimize the occurrence of bad plates, achieve consistent high-quality prints, and optimize production efficiency. Regular training, quality control workflows, and attention to detail are essential to ensure that flex printing processes remain reliable and cost-effective, producing sharp, accurate, and consistent images across all print runs.

how to install a duralast fuel filter ff831dl

how to make scent beads for laundry

how to make fruit and veggie wash
Can You Rent a Storage Unit for a Month?
How to Use KARR Security System: A Complete guide

Does Air Have a Mass?
-

 Beauty1 week ago
how to make your own cleansing oil
-

 Automotive2 weeks ago
How to Replace Windshield Washer Nozzle for 2013 Jeep Patriot
-

 Education1 week ago
how to print a report card in powerschool
-

 Electronics1 week ago
how to pair 2 jbl eon 715 speakers together
-

 Technology2 weeks ago
How to Set Honuras Time Zone on a WR20BAR G-Shock
-

 Automotive2 weeks ago
How to Replace Transmission Seal on A1078 Corvette
-

 Cleaning19 hours ago
how to make bath towels soft again
-

 Automotive2 weeks ago
how to remove cls450 front bumper cover forum