
Cleaning
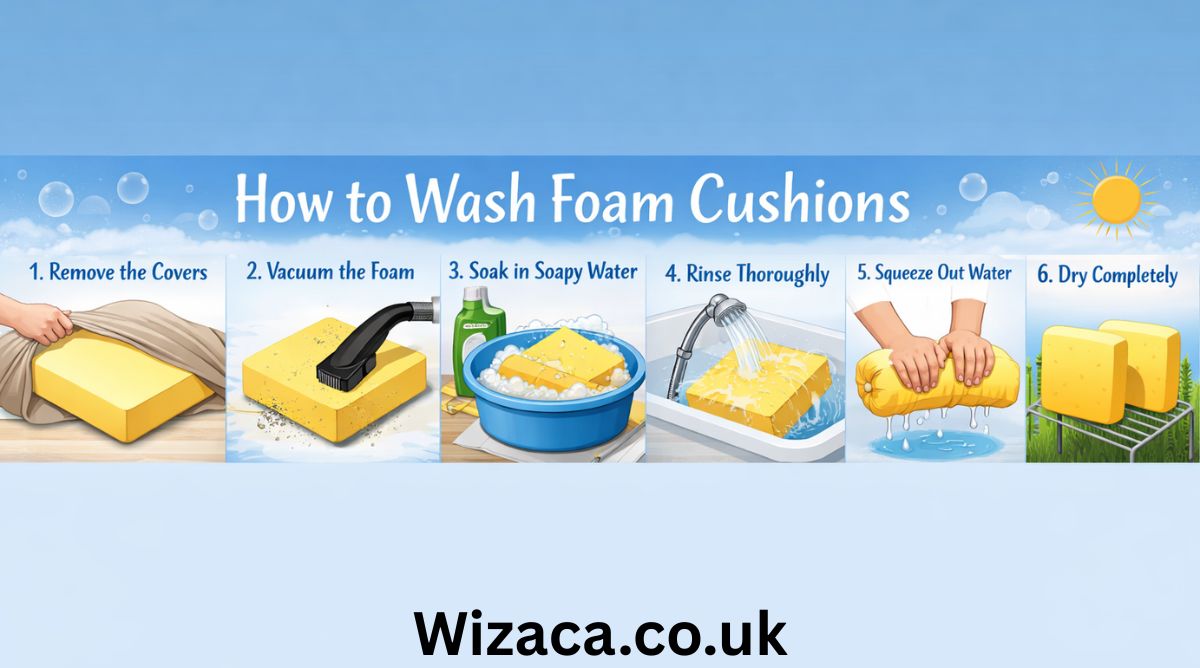
How to Wash Foam Cushions Properly (Step-by-Step Guide)
Foam cushions are widely used in homes, offices, cars, and outdoor furniture because they provide comfort, support, and durability. Whether you have seat cushions on your sofa, patio chairs, dining chairs, mattresses, or decorative pillows, knowing how to wash foam cushions properly is essential to maintain hygiene and extend their lifespan. Foam materials can trap dust, sweat, food particles, pet hair, and moisture over time. Without proper cleaning, they may develop unpleasant odors, stains, mold, or mildew.
Cleaning foam cushions requires a careful approach because foam is highly absorbent and delicate when wet. Using the wrong method can damage the structure, cause shrinkage, or lead to long drying times that promote mold growth. This comprehensive guide explains how to wash foam cushions safely, step by step, using the correct techniques for different situations.
Understanding Different Types of Foam Cushions
Before washing foam cushions, it is important to understand what type of foam you are dealing with. Different foams react differently to water and cleaning solutions.
Polyurethane foam is the most common type used in furniture cushions. It is soft, lightweight, and absorbs water easily. Memory foam, often used in mattresses and premium cushions, is denser and more sensitive to moisture. Latex foam is more resilient and naturally resistant to mold but still requires careful handling during cleaning. Outdoor cushions may contain quick-dry foam designed to allow water to pass through more easily.
Identifying your foam type helps determine the safest cleaning method. Always check manufacturer care instructions if available.
When Should You Wash Foam Cushions
You do not need to wash foam cushions frequently unless they are heavily soiled. However, certain situations require immediate cleaning. Spills from drinks, food stains, pet accidents, or visible dirt buildup should be addressed quickly. If cushions start to smell musty, it may indicate moisture retention or bacterial growth. Seasonal deep cleaning is recommended for outdoor furniture and high-traffic seating areas.
Regular vacuuming and spot cleaning can reduce the need for full washing. Preventive maintenance helps extend the life of foam cushions.
Preparing to Wash Foam Cushions
Proper preparation ensures better cleaning results and prevents damage. Start by removing the cushion covers if they are removable. Most covers can be machine washed separately according to fabric instructions. Never wash foam inserts in a washing machine unless specifically stated by the manufacturer, as the agitation can tear or distort the foam.
Take the foam cushions outdoors or to a well-ventilated area. Gather mild detergent, warm water, a spray bottle, soft cloths, a sponge, and a vacuum cleaner with an upholstery attachment. Avoid harsh chemicals, bleach, or strong solvents because they can break down foam structure.
If there are large debris particles, use a vacuum cleaner to remove dust, crumbs, and pet hair before applying any moisture.
How to Spot Clean Foam Cushions
Spot cleaning is the safest and most recommended method for most foam cushions. This method targets stains without soaking the entire cushion.
Mix a small amount of mild liquid detergent with warm water in a bowl. Dip a clean sponge or cloth into the solution and gently blot the stained area. Avoid scrubbing aggressively because it can damage the foam’s surface and push stains deeper.
Continue blotting until the stain begins to lift. Then use a clean damp cloth with plain water to remove soap residue. Press gently with a dry towel to absorb excess moisture. Allow the cushion to air dry completely in a well-ventilated area before placing it back in its cover.
How to Deep Wash Foam Cushions
If the cushion is heavily soiled or has absorbed odors, a deeper cleaning may be necessary. Fill a bathtub or large basin with lukewarm water and add a small amount of mild detergent. Submerge the foam cushion and gently squeeze it to allow the soapy water to penetrate. Do not twist or wring the foam, as this can tear it.
After soaking for about 10 to 15 minutes, drain the soapy water and refill the tub with clean water. Gently squeeze the cushion repeatedly to rinse out the detergent. Continue rinsing until no soap bubbles remain.
To remove excess water, press down on the cushion firmly with both hands. Do not wring it. Place the cushion on a flat surface and press with towels to absorb as much water as possible.
Drying Foam Cushions Properly
Drying is the most critical step when learning how to wash foam cushions. Foam retains water deeply, and improper drying can lead to mold growth. Always air dry foam cushions in a well-ventilated area. Placing them outside in the shade on a warm day is ideal. Avoid direct sunlight for extended periods because UV rays can weaken foam material.
Stand the cushion upright to allow air circulation on all sides. You may use fans to speed up drying. Depending on the thickness and humidity level, drying may take 24 to 48 hours. Ensure the cushion is completely dry before placing it back into its cover.
Never use a dryer or high heat source, as heat can shrink or damage foam.
Removing Odors from Foam Cushions
Odors often develop due to trapped moisture, sweat, or spills. Baking soda is an effective natural deodorizer. Sprinkle a generous amount of baking soda over the entire surface of the foam cushion and let it sit for several hours or overnight. Then vacuum thoroughly to remove the powder.
For stronger odors, you may use a mixture of white vinegar and water in a spray bottle. Lightly mist the cushion without soaking it. Vinegar helps neutralize bacteria and smells. Allow the cushion to air dry completely.
Cleaning Mold or Mildew from Foam Cushions
Mold can form if foam cushions remain damp for extended periods. If you notice black, green, or gray spots accompanied by a musty smell, act quickly.
Take the cushion outdoors to prevent spreading spores indoors. Brush off visible mold gently using a soft brush. Mix equal parts of water and white vinegar and lightly apply it to the affected area. Let it sit for about 15 minutes before blotting with a clean cloth. Avoid soaking the foam.
Dry the cushion thoroughly in direct airflow. If mold growth is severe and deeply embedded, replacing the foam may be safer for health reasons.
Washing Outdoor Foam Cushions
Outdoor cushions are exposed to rain, dust, pollen, and sun. Many outdoor cushions are made with quick-dry foam that allows water to pass through more easily. Even so, proper cleaning is essential.
Remove covers and wash them separately. Rinse the foam cushion with a garden hose to remove loose dirt. Use mild soap and a sponge to clean surface stains. Rinse thoroughly and stand upright to dry in an airy, sunny area. Outdoor foam typically dries faster than indoor foam.
Regular cleaning during outdoor seasons helps prevent mildew buildup.
Mistakes to Avoid When Washing Foam Cushions
One common mistake is putting foam cushions in a washing machine. The agitation cycle can tear the foam apart. Another mistake is using hot water or strong chemicals, which degrade foam structure. Twisting or wringing foam to remove water can cause permanent deformation.
Skipping proper drying is also dangerous. Even if the surface feels dry, internal moisture may remain. Always allow extra drying time to ensure full dryness.
Maintenance Tips to Keep Foam Cushions Clean Longer
Prevention reduces the need for frequent deep washing. Use washable covers whenever possible. Vacuum cushions weekly to remove dust and debris. Address spills immediately before they soak in. Rotate cushions regularly to distribute wear evenly.
For homes with pets or children, consider using waterproof liners under fabric covers. Store outdoor cushions in a dry place during rainy seasons. Proper storage prevents moisture accumulation.
How Often Should You Wash Foam Cushions
The frequency of washing depends on usage. Indoor sofa cushions may need deep cleaning once or twice a year, while outdoor cushions may require seasonal washing. Spot cleaning should be done immediately after spills. Regular vacuuming should be part of weekly cleaning routines.
If someone in the household suffers from allergies, more frequent cleaning may help reduce dust mites and allergens.
Special Care for Memory Foam Cushions
Memory foam requires extra caution because it is denser and absorbs water more slowly. Avoid full submersion whenever possible. Spot cleaning is strongly recommended. If deep cleaning is necessary, use minimal water and ensure extended drying time.
Memory foam can lose its supportive structure if handled roughly. Always press gently instead of squeezing aggressively.
Final Thoughts on How to Wash Foam Cushions
Learning how to wash foam cushions correctly can significantly extend their lifespan and maintain a fresh, hygienic environment in your home. The key principles include using mild cleaning solutions, avoiding excessive water, never using harsh chemicals, and ensuring complete drying before reuse. Whether you are dealing with light stains, heavy dirt, or unpleasant odors, applying the proper cleaning techniques will help keep your foam cushions comfortable and long-lasting.
By following the correct methods and avoiding common mistakes, you can preserve the quality, shape, and durability of your cushions for years to come. Regular maintenance combined with proper washing techniques ensures that your seating remains clean, supportive, and inviting in every season.
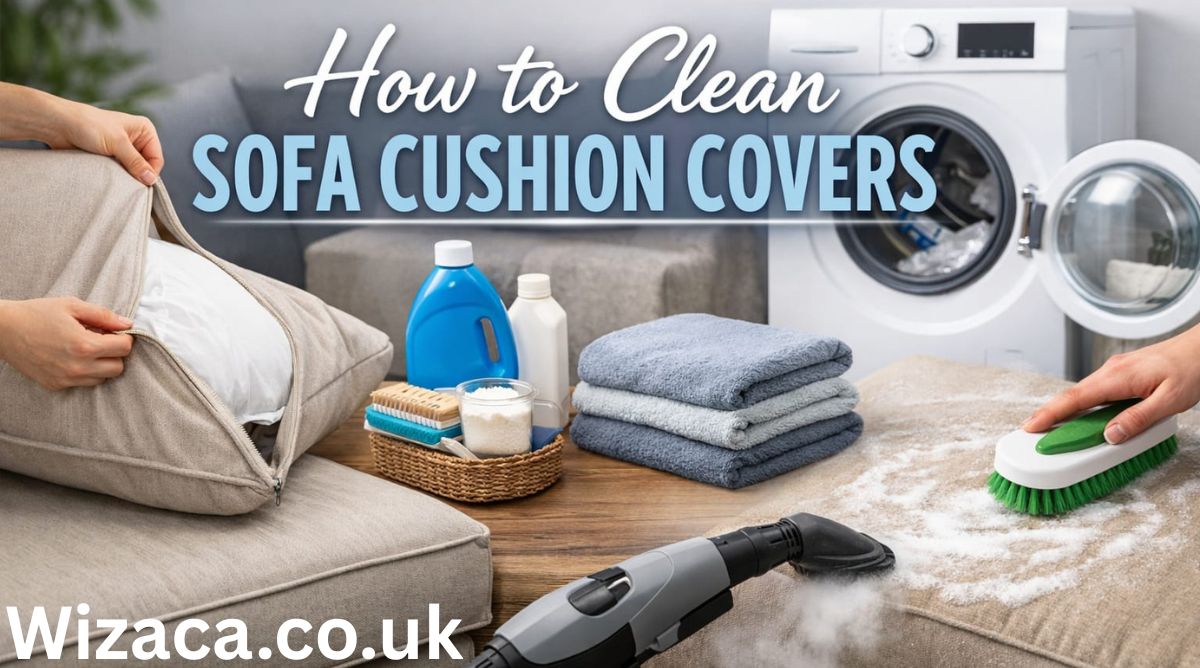
Sofa cushion covers play a major role in maintaining the cleanliness, comfort, and appearance of your living space. Over time, these covers collect dust, dirt, spills, body oils, pet hair, and everyday stains. Because they are used frequently, they can quickly lose their freshness if not cleaned properly. Learning how to clean sofa cushion covers the right way helps extend their life, maintain hygiene, and keep your home looking neat and inviting.
Cleaning cushion covers is not just about removing visible dirt. It also involves preserving the fabric, preventing damage, and ensuring that the covers retain their original color and texture. Different materials require different cleaning approaches, so understanding the fabric type is the first step toward proper care.
With the right techniques and regular maintenance, you can keep your sofa cushion covers looking as good as new without causing unnecessary wear or damage.
understanding different fabric types
Before cleaning sofa cushion covers, it is essential to identify the type of fabric. Different materials react differently to water, heat, and cleaning solutions. Using the wrong method can lead to shrinking, fading, or fabric damage.
Cotton covers are common and relatively easy to clean. They are usually machine washable but may shrink if washed in hot water. Polyester and synthetic blends are durable and resistant to wrinkles, making them easier to maintain.
Linen covers require more delicate handling because they can shrink and wrinkle easily. Velvet and suede materials are more sensitive and often require special cleaning methods rather than standard washing.
Some cushion covers come with care labels that provide cleaning instructions. Paying attention to these guidelines ensures safe and effective cleaning.
preparing cushion covers for cleaning
Proper preparation makes the cleaning process more effective. Start by removing the cushion covers from the sofa carefully. Check for zippers or fasteners and open them gently to avoid tearing.
Shake the covers outside to remove loose dust, crumbs, and debris. Using a vacuum cleaner with a brush attachment can help remove embedded dirt and pet hair.
Inspect the covers for stains and identify areas that require special attention. Pre-treating stains before washing helps achieve better results.
Preparation ensures that the cleaning process focuses on deep cleaning rather than just surface dirt.
machine washing cushion covers
Many sofa cushion covers can be cleaned using a washing machine, but it is important to follow proper steps to avoid damage.
Turn the covers inside out before placing them in the machine. This helps protect the outer surface and maintain color quality. Use a gentle cycle with cold or lukewarm water to prevent shrinking or fading.
Choose a mild detergent that is suitable for delicate fabrics. Avoid using bleach unless it is specifically recommended for the material, as it can weaken fibers and cause discoloration.
Do not overload the washing machine, as this can prevent proper cleaning and increase wear on the fabric. Washing covers separately or in small batches is usually more effective.
After the wash cycle is complete, remove the covers promptly to avoid wrinkles and odors.
hand washing delicate fabrics
For delicate materials such as linen, velvet, or embroidered covers, hand washing is often the safest option.
Fill a basin with lukewarm water and add a small amount of mild detergent. Submerge the cushion covers and gently agitate the water to loosen dirt.
Avoid scrubbing or twisting the fabric, as this can damage fibers and alter the shape. Instead, gently press the fabric to clean it.
Rinse thoroughly with clean water to remove all detergent. Excess soap residue can make the fabric feel stiff or attract more dirt.
Hand washing takes more time but helps preserve the quality and appearance of delicate fabrics.
removing stains effectively
Stains are one of the most common issues with sofa cushion covers. Treating them correctly ensures better cleaning results.
For food or beverage stains, blot the area immediately with a clean cloth to absorb excess liquid. Avoid rubbing, as this can spread the stain.
A mixture of mild detergent and water can be used to treat most stains. Apply the solution to the affected area and gently dab with a cloth.
For tougher stains such as grease or ink, specialized stain removers may be required. Always test the product on a hidden area before applying it to visible parts of the cover.
Prompt stain removal prevents permanent marks and keeps the covers looking clean.
drying cushion covers properly
Drying is an important step in cleaning sofa cushion covers. Improper drying can lead to shrinkage, wrinkles, or fabric damage.
Air drying is generally the safest method. Lay the covers flat on a clean surface or hang them in a well-ventilated area. Avoid direct sunlight, as it can cause fading.
If using a dryer, choose a low heat or delicate setting. High heat can shrink or weaken the fabric. Removing the covers while they are slightly damp can help reduce wrinkles.
Ensure that the covers are completely dry before placing them back on the cushions. Damp fabric can lead to mold or unpleasant odors.
Proper drying helps maintain the shape and quality of the covers.
ironing and finishing touches
Some fabrics may require ironing after cleaning to restore their smooth appearance. Use a low to medium heat setting depending on the fabric type.
Turn the covers inside out before ironing to protect the outer surface. For delicate materials, placing a cloth between the iron and the fabric can prevent damage.
Steaming is another option that can remove wrinkles without direct heat contact. This method is especially useful for sensitive fabrics.
Finishing touches like ironing or steaming enhance the overall look of the cushion covers.
maintaining cleanliness regularly
Regular maintenance reduces the need for deep cleaning and helps keep cushion covers in good condition.
Vacuuming the covers weekly removes dust and prevents buildup. Rotating cushions can also ensure even wear and maintain their shape.
Spot cleaning small stains immediately prevents them from becoming permanent. Using throws or protective covers can help reduce direct exposure to dirt and spills.
Establishing a routine makes cleaning easier and keeps your sofa looking fresh.
dealing with odors
Cushion covers can sometimes develop odors due to spills, pets, or prolonged use. Removing odors requires proper cleaning and airing.
Baking soda can be sprinkled on the covers before washing to help absorb odors. Let it sit for some time before vacuuming it off.
Washing with mild detergent and allowing the covers to air dry in a well-ventilated area can eliminate most smells. Proper drying is essential to prevent musty odors.
Maintaining good ventilation in the room also helps keep fabrics fresh.
protecting cushion covers from future dirt
Preventing dirt and stains is easier than cleaning them later. Simple habits can help keep cushion covers clean for longer periods.
Avoid eating or drinking on the sofa to reduce the risk of spills. Keeping pets off the furniture or using pet-friendly covers can minimize hair and dirt.
Using slipcovers or protective layers adds an extra barrier against stains. Regular cleaning and maintenance also play a key role in prevention.
These practices help extend the life of your cushion covers.
when to seek professional cleaning
In some cases, professional cleaning may be necessary. Covers made from delicate or expensive materials may require specialized care.
If stains are deeply embedded or if the fabric is labeled as dry clean only, professional services can provide safe and effective cleaning.
Professional cleaners have the expertise and equipment to handle difficult cleaning situations without damaging the fabric.
Knowing when to seek help ensures that your cushion covers are properly cared for.
conclusion
Learning how to clean sofa cushion covers is essential for maintaining a clean, comfortable, and visually appealing living space. By understanding fabric types, using appropriate cleaning methods, and following proper drying techniques, you can keep your cushion covers in excellent condition.
Regular maintenance, prompt stain removal, and careful handling help extend the life of the fabric and preserve its appearance. Whether using a washing machine, hand washing, or professional cleaning, choosing the right approach ensures the best results.
With consistent care and attention, sofa cushion covers can remain fresh, clean, and inviting for a long time, enhancing the overall comfort and beauty of your home.

Learning how to get dirt stains out of baseball pants is essential for players, parents, and coaches who regularly deal with grass slides, muddy dives, and dusty fields. Baseball pants are designed to withstand intense movement, but they are also known for attracting stubborn stains, especially because most are white or light colored. Dirt, clay, and grass can quickly embed into the fabric fibers, making stains appear permanent if not treated properly. Fortunately, with the right pre treatment methods, washing techniques, and stain removal strategies, you can restore baseball pants to a clean and bright condition without damaging the material. Understanding how stains form and how to break them down is the key to successful cleaning.
Why Dirt Stains Are So Difficult to Remove
Before understanding how to get dirt stains out of baseball pants, it is important to know why these stains are so persistent. Baseball fields often contain a mixture of clay, sand, soil, and organic material. When a player slides or falls, the moisture from sweat or damp ground helps dirt penetrate deep into the fabric fibers. Once the pants dry, the soil particles settle firmly into the weave. Standard washing alone often fails to lift these particles completely, which is why pre treatment is necessary.
Act Quickly for Best Results
The sooner you treat dirt stains, the easier they are to remove. Fresh stains are less likely to bond permanently with fabric fibers. If possible, shake off loose dirt immediately after the game. Avoid rubbing dry dirt into the fabric, as this can push it deeper. Prompt action significantly improves your success when learning how to get dirt stains out of baseball pants.
Shake and Brush Off Loose Dirt
Before applying any cleaning solution, remove excess dirt. Allow the pants to dry fully if they are wet and muddy. Once dry, gently shake them outside. Use a soft brush or an old toothbrush to loosen caked on dirt. Removing surface debris prevents mud from spreading during washing.
Pre Soak in Cold Water
Cold water soaking is an effective first step. Fill a basin or sink with cold water and submerge the stained areas for at least thirty minutes. Cold water helps loosen soil particles without setting the stain. Avoid hot water at this stage because heat can cause stains to bind more firmly to the fabric.
Apply Liquid Laundry Detergent Directly
After soaking, apply a small amount of liquid laundry detergent directly to the stained areas. Gently rub the fabric together or use a soft brush to work the detergent into the fibers. This helps break down embedded dirt. Let the detergent sit for fifteen to twenty minutes before rinsing. Direct application is a key technique in how to get dirt stains out of baseball pants effectively.
Use Baking Soda and Water Paste
For tougher stains, create a paste using baking soda and a small amount of water. Spread the paste over the stained areas and allow it to sit for thirty minutes. Baking soda acts as a mild abrasive and helps lift dirt from fibers. After treatment, rinse thoroughly with cold water.
Vinegar Treatment for Stubborn Stains
White vinegar can help break down mineral components found in clay heavy dirt. Mix equal parts vinegar and cold water and apply it to the stain. Let it sit briefly, then gently scrub with a soft brush. Rinse thoroughly before washing. This method works well when combined with detergent pre treatment.
Oxygen Based Stain Removers
Oxygen based cleaners are effective for white or light colored baseball pants. These products help lift stains without harsh bleaching effects. Follow the product instructions carefully. Soak the pants in a solution for several hours if stains are severe. Oxygen cleaners are particularly helpful when learning how to get dirt stains out of baseball pants after multiple games.
Avoid Using Hot Water Too Early
Heat can set dirt and grass stains permanently. Always complete pre treatment and rinsing steps before using warm or hot water. Once stains are fully removed, you may wash according to the garment care label.
Washing the Pants Properly
After pre treatment, wash the pants separately from other clothing. Use a quality detergent and select a heavy duty cycle if the fabric allows. Avoid overloading the washing machine, as adequate movement is necessary for proper cleaning.
Inspect Before Drying
Never place baseball pants in the dryer until you are sure the stain is completely gone. Drying with heat can permanently set any remaining discoloration. After washing, inspect the pants carefully under good lighting. If stains remain, repeat the treatment process before drying.
Dealing With Grass Stains
Grass stains often accompany dirt marks. These stains contain chlorophyll, which bonds strongly with fabric. Apply detergent directly and gently rub. You can also use a small amount of rubbing alcohol on a cloth to dab the area before washing. Always rinse afterward.
Treating Red Clay Stains
Red clay fields create particularly stubborn stains. For these, apply detergent and allow it to sit longer than usual. Oxygen based cleaners are especially effective against red clay. Repeating the soak and wash cycle may be necessary for complete removal.
Preventing Future Stains
While baseball pants are meant to endure sliding and diving, preventive steps can make cleaning easier. Rinse pants immediately after games when possible. Avoid letting mud dry completely before initial cleaning. Establishing a routine simplifies how to get dirt stains out of baseball pants consistently.
Using a Laundry Brush
A soft bristle laundry brush can help lift deeply embedded dirt. Use gentle circular motions rather than aggressive scrubbing. Excess force can weaken fabric fibers over time.
Proper Drying Methods
Once stains are fully removed, air dry the pants whenever possible. Air drying helps maintain fabric strength and prevents shrinkage. If using a dryer, select a low heat setting.
Long Term Fabric Care
Repeated washing and scrubbing can wear down baseball pants over time. To extend their lifespan, avoid harsh chemicals such as chlorine bleach unless specifically recommended by the garment label. Follow manufacturer instructions carefully.
Common Mistakes to Avoid
Do not rub wet mud aggressively. Avoid using hot water before stain removal. Never skip inspection before drying. Do not mix stained pants with heavily soiled items that may transfer dirt. Avoid overusing bleach, as it can weaken fibers and cause yellowing.
Final Thoughts
Understanding how to get dirt stains out of baseball pants requires patience, prompt action, and proper technique. Dirt stains are stubborn because soil particles embed deeply into fabric fibers, especially during slides and dives on the field. By shaking off loose dirt, soaking in cold water, applying detergent directly, using baking soda or vinegar for stubborn areas, and washing properly without heat until stains are removed, you can restore baseball pants to a clean and bright condition. Consistent care and immediate treatment after games make future cleaning easier and help maintain the durability and appearance of the pants throughout the season.

How to make scent beads for laundry is a popular topic among people who want fresh, long-lasting fragrance in their clothes without relying entirely on store-bought products. Homemade scent beads allow you to control ingredients, customize fragrance intensity, and avoid unnecessary additives. Whether you want a light floral aroma, a clean cotton smell, or a calming lavender touch, making your own laundry scent beads can be simple, affordable, and highly effective when done correctly. Understanding the ingredients, preparation process, storage methods, and usage techniques is essential for achieving the best results. This detailed guide explains everything step by step so you can create effective and safe scent beads at home.
Understanding What Laundry Scent Beads Are
Before learning how to make scent beads for laundry, it is important to understand what they actually do. Laundry scent beads are small granules added directly into the washing machine drum before clothes are loaded. Unlike fabric softeners that coat fibers to reduce static and increase softness, scent beads primarily focus on fragrance. They dissolve in water during the wash cycle and infuse fabrics with a lasting scent. Commercial scent beads often contain synthetic fragrance compounds and stabilizers. When making them at home, you can choose more natural ingredients and adjust fragrance strength according to preference.
Benefits of Making Your Own Scent Beads
There are several advantages to preparing homemade scent beads. First, you can avoid harsh chemicals or artificial dyes that may irritate sensitive skin. Second, you control the scent intensity. Some people prefer subtle fragrance while others enjoy strong, long-lasting aromas. Third, homemade versions are cost-effective compared to repeatedly purchasing commercial products. Finally, you can experiment with essential oil blends to create personalized scent combinations tailored to different seasons or moods.
Choosing the Right Base Ingredient
The most common base ingredient when learning how to make scent beads for laundry is coarse salt. Epsom salt and sea salt are especially popular because they absorb essential oils well and dissolve easily in water. Salt acts as a carrier for fragrance and helps distribute scent evenly during the wash cycle. Baking soda is another ingredient sometimes added in small amounts. It helps neutralize odors and boosts freshness. However, salt remains the primary component because of its texture and dissolving properties.
Selecting Essential Oils for Fragrance
Essential oils provide the scent in homemade laundry beads. Choosing high-quality oils ensures better fragrance retention. Lavender is widely used for its calming aroma. Lemon and orange provide fresh, clean notes. Eucalyptus gives a crisp and refreshing scent. Peppermint adds a cool and invigorating touch. You can also blend oils such as lavender and vanilla for warmth or lemon and rosemary for brightness. When combining oils, test small batches first to determine balance. Strong oils like peppermint require fewer drops, while lighter citrus oils may need slightly more for noticeable fragrance.
Basic Ingredients and Tools Needed
To understand how to make scent beads for laundry properly, gather the necessary materials. You will need coarse Epsom salt or sea salt, baking soda if desired, essential oils of your choice, a large mixing bowl, a spoon for stirring, and an airtight container for storage. Measuring cups and spoons ensure consistent ratios. Glass jars with tight lids work well for preserving fragrance over time.
Step by Step Preparation Method
Start by pouring two cups of Epsom salt into a mixing bowl. If you want odor-neutralizing properties, add two tablespoons of baking soda. Mix dry ingredients thoroughly to ensure even distribution. Next, add 20 to 30 drops of essential oil. The exact amount depends on fragrance strength preference. Stir continuously while adding drops to prevent clumping. Mix until the salt evenly absorbs the oil and no wet patches remain. If clumps form, break them apart gently with a spoon. Once fully blended, transfer the mixture into an airtight container and seal tightly. Allow the scent beads to sit for at least 24 hours before use. This resting period allows fragrance to bind properly to the salt crystals.
Adjusting Fragrance Strength
One important aspect of how to make scent beads for laundry is balancing scent intensity. If fragrance seems too light after the resting period, add a few more drops of essential oil and mix again. If it is too strong, dilute by adding more salt. Always increase fragrance gradually to avoid overpowering results. Remember that scent may appear subtle in dry form but becomes stronger once activated by water and heat during washing and drying.
Creative Scent Blend Ideas
Creating signature blends enhances personalization. A relaxing blend may include lavender and chamomile. A refreshing blend might combine lemon and eucalyptus. For a cozy winter scent, try orange with clove. Floral lovers may enjoy rose and geranium combinations. When experimenting, maintain a balanced ratio. Start with 15 drops of one oil and 10 of another, then adjust after testing. Keeping notes of successful combinations helps replicate favorite recipes later.
Proper Storage Techniques
Storage plays a key role in maintaining fragrance quality. Keep scent beads in airtight glass containers away from direct sunlight and heat. Excess exposure can cause essential oils to evaporate or degrade. Properly stored beads can retain scent for several months. If fragrance fades over time, refresh by adding a few additional oil drops and mixing again. Always shake the container gently before use to redistribute oils evenly.
How to Use Homemade Scent Beads
Using homemade beads correctly ensures best performance. Add one to two tablespoons directly into the empty washing machine drum before placing clothes inside. Do not put them in the detergent dispenser. The beads need direct contact with water at the start of the wash cycle. They dissolve completely and infuse fabrics with fragrance. Adjust quantity based on load size and scent preference. For heavily soiled laundry, use normal detergent as usual; scent beads complement but do not replace cleaning agents.
Compatibility with Different Washing Machines
Homemade scent beads work in both standard and high-efficiency washing machines. Because salt dissolves fully in water, it should not clog systems when used in moderate amounts. However, avoid excessive quantities. Stick to recommended portions to ensure proper dissolving. Always ensure beads are fine enough and not overly clumped before adding to the machine.
Safety Considerations
When learning how to make scent beads for laundry, safety should be prioritized. Some essential oils may cause skin sensitivity, especially for individuals with allergies. Always test oils on a small piece of fabric before full use. Avoid using strong oils like cinnamon in large quantities, as they may irritate skin. If washing baby clothes, consider using mild scents such as lavender and use reduced oil quantities. Keep essential oils out of reach of children and pets.
Avoiding Common Mistakes
A common mistake is adding too much oil, which can leave oily residue on clothing. Another error is insufficient mixing, leading to uneven scent distribution. Always stir thoroughly and allow resting time. Avoid using finely powdered salt, as it may clump excessively. Choose coarse granules for best absorption.
Enhancing Longevity of Scent
To maximize scent retention, pair homemade beads with air drying or low heat drying cycles. High heat can cause fragrance to dissipate quickly. Storing freshly washed clothes in drawers or closets with good airflow also helps preserve aroma.
Environmental Advantages
Homemade scent beads can be more environmentally friendly compared to synthetic commercial versions. By using simple ingredients like salt and essential oils, you reduce exposure to artificial fragrances and plastic-heavy packaging. Reusing glass jars further minimizes waste. Choosing responsibly sourced essential oils enhances sustainability.
Cost Comparison
Making scent beads at home is typically more economical over time. A large bag of Epsom salt and a small bottle of essential oil can produce multiple batches. Commercial scent boosters are often priced higher per load. Homemade alternatives allow budget flexibility without sacrificing freshness.
Customizing for Seasonal Use
Different seasons inspire different scents. Spring blends may include floral notes. Summer often pairs well with citrus aromas. Autumn blends can incorporate warm spices in minimal quantities. Winter scents may focus on comforting and woody tones. Adjusting fragrance according to season keeps laundry routines enjoyable year round.
Final Thoughts
Understanding how to make scent beads for laundry empowers you to create personalized, cost-effective, and customizable fragrance solutions at home. With simple ingredients such as Epsom salt and essential oils, you can craft scent beads tailored to your preferences. By carefully measuring ingredients, mixing thoroughly, storing properly, and using appropriate quantities, you ensure effective and long-lasting results. Homemade scent beads not only enhance freshness but also give you control over what touches your fabrics and skin. With patience and creativity, you can refine your blends and enjoy beautifully scented laundry every time you wash your clothes.

Who is Diven Labollita? Biography, Career, and Updates

How Much is Juan Ibarra Worth? Net Worth and Earnings (2026)

activities brought to you by lookwhatmomfound lwmfcrafts

Does a Check Engine Light Fail Inspection?
How to Adjust U-Haul Mirrors for Safe Driving
How to Load a 10′ U-Haul Truck Efficiently
-

 General2 weeks ago
6043953585: Official Contact Information
-

 Technology2 weeks ago
Download Software tgd170.fdm.97 New Release: Latest Version
-

 Home Decor2 weeks ago
look what mom found fathead wall graphic giveaway
-
 Lifestyle2 weeks ago
activities brought to you by lookwhatmomfound lwmfcrafts
-

 Business2 weeks ago
Innovative Lighting Solutions by Ronin Stegner Lighting Design
-

 General2 weeks ago
604-295-3505 Phone Number Owner & Location Info
-

 General2 weeks ago
5879339052: Everything You Need to Know About This Number
-
 Entertainment1 week ago
How Much is Juan Ibarra Worth? Net Worth and Earnings (2026)