
Home
how many loads of laundry per week

Doing laundry is a fundamental part of household management, yet many people struggle with determining how many loads of laundry they should do each week. The number of laundry loads depends on factors like family size, lifestyle, clothing types, and the capacity of the washing machine. Understanding these variables can help optimize laundry routines, save energy and water, and ensure that clothes are properly cared for without overloading machines or creating unnecessary clutter.A comprehensive guide on how many loads of laundry per week are typical, the factors that influence this number, and strategies for efficient laundry management.
average laundry loads by household size
The number of laundry loads varies significantly depending on the number of people in a household. Understanding these averages can help plan weekly laundry routines effectively.
- Single person household: A single individual typically generates around 3–5 loads of laundry per week, depending on clothing types and frequency of outfit changes. Work attire, casual clothes, and gym wear all contribute to laundry frequency.
- Two-person household: Two adults generally produce 6–8 loads weekly. This includes everyday wear, undergarments, towels, and occasional bedding. The addition of gym clothes or outdoor workwear can increase the number of loads.
- Family of four: A household with two adults and two children usually generates 10–14 loads per week. Children’s clothes often require more frequent washing due to spills, outdoor play, and higher clothing turnover.
- Large families (five or more): Larger families may need 15–20 or more loads per week. Beyond clothing, extra loads may include towels, bed linens, and school uniforms.
factors affecting laundry frequency
Several key factors determine how many loads of laundry are needed per week:
lifestyle and daily activities
People who are highly active or engage in sports, outdoor work, or physically demanding jobs tend to generate more laundry. Gym clothes, uniforms, and work gear may need daily washing, increasing weekly laundry loads.
clothing types and fabrics
Different fabrics and clothing types require varying care. Heavy fabrics like jeans or work pants may not need washing after each use, while undergarments, socks, and workout clothes usually require more frequent laundering. Delicate fabrics may need special washing cycles, which can influence load planning.
towels and bed linens
Towels and bed linens are separate from daily clothing and generally require weekly washing. Families with multiple bathrooms or children may need additional loads for towels, washcloths, and sheets. Proper hygiene dictates washing towels every 3–4 days in active households, while bed linens are typically washed once a week.
machine capacity
The size of the washing machine plays a crucial role in determining how many loads are needed. Larger machines (10–12 kg capacity) can handle more items per load, reducing the total number of loads per week. Smaller machines may require more frequent cycles to accommodate the same amount of laundry.
household habits
Laundry habits, such as whether clothes are worn multiple times before washing or if certain items are hand-washed, affect load frequency. Efficient sorting of laundry by color and fabric type also helps manage loads effectively.
calculating loads based on clothing items
An easy method to estimate weekly laundry loads is to categorize clothing and items:
- Tops (shirts, blouses, t-shirts): 5–7 per person per week
- Bottoms (pants, skirts, shorts): 3–5 per person per week
- Undergarments (underwear, bras, socks): 7–10 per person per week
- Sleepwear: 2–3 per person per week
- Outerwear (jackets, coats): Usually washed seasonally or after heavy use
- Workout clothes: Washed after each session
- Towels and washcloths: 3–5 per person per week
- Bed linens: Typically 1–2 sets per person per week
By summing these items and considering the washing machine capacity, households can estimate the number of loads they should schedule weekly.
tips for managing weekly laundry loads
Efficient laundry management helps reduce energy, water consumption, and time spent on chores. Here are strategies for managing weekly loads:
establish a laundry schedule
Creating a regular laundry schedule prevents overwhelming piles of dirty clothes. Some households do laundry daily, while others allocate specific days for different types of laundry, such as bedding, towels, or clothing.
sort by fabric and color
Sorting laundry into categories such as whites, darks, delicates, and heavy fabrics improves washing efficiency, prevents color transfer, and allows the use of optimal wash cycles.
maximize machine capacity
Always aim to fill the washing machine close to capacity without overloading. Overloading reduces washing effectiveness, while underloading wastes water and energy.
use appropriate detergents and settings
Using the right detergent type and washing machine settings ensures optimal cleaning and fabric care. High-efficiency detergents are suitable for modern machines and allow for larger loads with better cleaning results.
fold and store promptly
Promptly folding and storing clothes after drying prevents wrinkles, reduces ironing time, and encourages a consistent laundry routine.
environmental and cost considerations
Reducing weekly laundry loads can help conserve water, energy, and detergents, resulting in cost savings. Strategies include:
- Washing full loads: Minimizes water and energy usage.
- Cold water washes: Save energy while effectively cleaning many clothing types.
- Air drying when possible: Reduces electricity consumption compared to dryer use.
- Using eco-friendly detergents: Reduces environmental impact.
Efficient laundry practices not only save money but also contribute to sustainable household management.
common misconceptions about laundry frequency
Some people overestimate the need for washing certain clothing items, such as jeans or jackets, after every wear. Over-washing can damage fabrics and increase laundry loads unnecessarily. Understanding which items truly require frequent washing helps reduce weekly loads without compromising hygiene.
adapting laundry frequency for special situations
Certain situations may require adjustments to laundry schedules:
- Illness: Clothing and linens may need more frequent washing to prevent the spread of germs.
- Children: Young children and infants may require daily clothing changes due to spills and accidents.
- Seasonal changes: Winter clothing like coats and heavy sweaters may accumulate less dirt and require fewer washes, while summer clothing may need more frequent laundering.
- Pets: Households with pets may require additional loads to manage pet bedding, towels, and clothing affected by pet hair.
Flexibility in laundry planning ensures hygiene and efficiency are maintained.
conclusion
The number of laundry loads per week varies widely depending on household size, lifestyle, clothing types, and washing machine capacity. Single individuals may require 3–5 loads per week, while families of four may need 10–14 loads or more. Understanding these factors, establishing a laundry schedule, sorting appropriately, and using efficient washing practices can help manage weekly laundry effectively. By balancing hygiene, convenience, and sustainability, households can maintain clean clothing, bedding, and towels while minimizing effort, cost, and environmental impact. Efficient laundry management ensures that weekly loads are handled smoothly without overwhelming household members.

Making your closet smell good involves a combination of cleanliness, odor control, and scent infusion techniques. A pleasant-smelling closet enhances the freshness of clothes, improves the overall atmosphere of your home, and prevents musty odors from developing. Understanding how to make your closet smell good requires considering factors such as ventilation, storage methods, natural and artificial deodorizers, and routine maintenance practices.
ensure proper ventilation
Proper ventilation is the foundation for maintaining a fresh-smelling closet. Poor airflow can lead to moisture accumulation, which encourages mold and mildew growth, resulting in unpleasant odors. To ensure adequate ventilation:
- Leave doors slightly open when possible to allow air circulation.
- Install vents or grilles in closets that are enclosed or lack natural airflow.
- Use a small fan or air purifier to keep air moving, particularly in larger walk-in closets.
- Avoid overpacking the closet, as densely packed clothing can restrict airflow and trap moisture.
maintain cleanliness
Regular cleaning of your closet is essential for preventing odors from developing. Dust, dirt, and fabric particles can accumulate over time, creating a breeding ground for bacteria that cause smells. Steps to maintain cleanliness include:
- Vacuuming or sweeping the floor to remove dust and debris.
- Wiping down shelves and surfaces with a mild detergent solution to remove grime.
- Cleaning or laundering clothing before storing, as dirty clothes can be a primary source of odor.
- Inspecting shoes and accessories for signs of mold or odor buildup and cleaning them regularly.
control moisture
Moisture is one of the main contributors to unpleasant closet smells. Dampness can arise from humidity, wet clothing, or leaks. Controlling moisture involves:
- Using moisture absorbers such as silica gel packets, activated charcoal, or desiccant bags to reduce humidity levels.
- Ensuring clothes are dry before placing them in the closet.
- Repairing leaks or water issues in nearby walls or ceilings.
- Using a dehumidifier in areas prone to excessive humidity to maintain optimal air conditions.
utilize natural deodorizers
Natural deodorizers are an effective way to make your closet smell good without using chemical sprays. Common natural options include:
- Baking soda: Placed in small containers or sachets, it absorbs odors effectively.
- Activated charcoal: Highly porous and excellent for neutralizing smells.
- Essential oils: Oils such as lavender, cedarwood, eucalyptus, or lemon can be applied to cotton balls, wooden blocks, or diffusers to impart a pleasant aroma.
- Herbal sachets: Dried herbs such as rosemary, thyme, or chamomile placed in cloth bags can freshen up the closet naturally.
use commercial closet fresheners
Commercial products provide a convenient solution for maintaining a good-smelling closet. These include:
- Aromatic sachets and bags: Pre-filled with fragrances like vanilla, cedar, or floral scents.
- Spray deodorizers: Used occasionally to quickly neutralize odors and refresh the closet.
- Plug-in air fresheners or battery-operated diffusers: Provide continuous scent and can be set to desired intensity levels.
- Odor-absorbing hangers: Designed to eliminate musty smells while allowing clothes to breathe.
incorporate cedar and wood elements
Cedar and other aromatic woods are particularly effective for keeping closets smelling fresh. They not only impart a pleasant scent but also repel moths and insects. Techniques include:
- Cedar hangers: Replace plastic or metal hangers with cedar versions.
- Cedar blocks or balls: Place them on shelves or in drawers to release fragrance over time.
- Wooden drawer liners: Add a natural scent to the storage areas while protecting fabrics.
rotate clothing and shoes
Closets can develop stale odors if items remain in the same place for extended periods. Rotating clothing and shoes ensures air circulation and prevents odor buildup. Suggestions include:
- Seasonal rotation: Store out-of-season clothes in breathable containers with deodorizing sachets.
- Rotate shoes: Avoid storing damp or sweaty shoes continuously in the same spot.
- Air out infrequently used items: Periodically remove and expose them to fresh air.
laundry habits
Maintaining proper laundry practices directly affects closet freshness. Clothes that are improperly washed or stored damp can contribute to unpleasant smells. Best practices include:
- Wash clothes regularly according to their care instructions.
- Dry thoroughly before returning items to the closet.
- Separate strong-smelling garments such as workout clothes or outerwear to prevent odors from spreading.
monitor for pests and mold
Closets can attract pests such as moths, silverfish, and ants, as well as develop mold in damp environments. Prevention strategies include:
- Using moth repellents like cedar, lavender, or commercial mothballs placed strategically.
- Inspecting for signs of pests periodically and addressing infestations promptly.
- Cleaning and drying affected areas if mold is detected to prevent recurrence.
maintain routine
A fresh-smelling closet requires consistent upkeep. Routine practices include:
- Weekly air circulation by opening doors or windows.
- Monthly dusting and vacuuming to remove accumulated particles.
- Quarterly rotation and inspection of clothing and accessories.
- Replacing deodorizers as needed to maintain effectiveness.
additional tips for lasting freshness
To maximize closet freshness, consider these additional strategies:
- Use breathable storage containers instead of sealed plastic bins to allow airflow.
- Hang scented sachets strategically near clothing rather than clustering in one corner.
- Keep shoes and bags outside the main closet area if possible.
- Avoid overloading the closet to reduce humidity and allow proper ventilation.
conclusion
Making your closet smell good involves a holistic approach that combines cleanliness, odor control, ventilation, and the use of natural or commercial scent solutions. By implementing proper storage methods, controlling moisture, incorporating aromatic elements such as cedar or essential oils, and maintaining consistent cleaning and rotation routines, you can ensure that your closet remains fresh and inviting. With regular attention and strategic use of deodorizers and ventilated storage, any closet can be transformed into a space that smells clean, fresh, and pleasant.
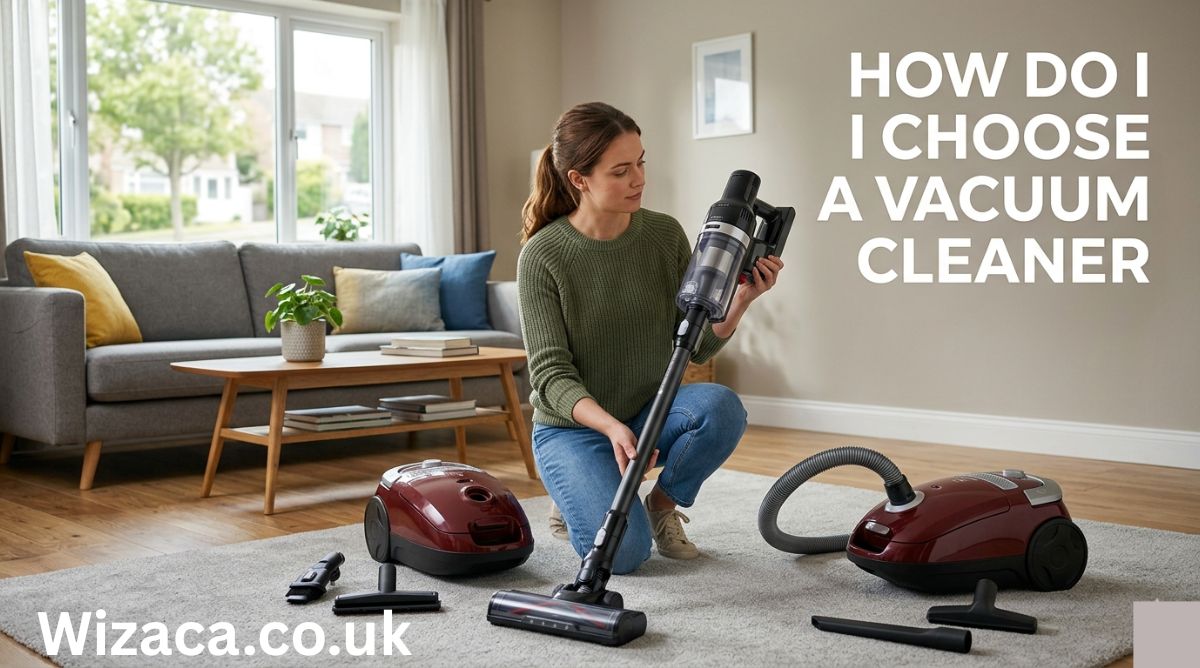
Choosing a vacuum cleaner may seem straightforward, but with so many types, features, and price points, it can quickly become overwhelming. The right vacuum cleaner depends on your living space, cleaning needs, and personal preferences. Understanding the differences between models, their features, and the factors that affect performance will help you make an informed decision.
understanding the types of vacuum cleaners
Vacuum cleaners come in several types, each designed for specific purposes. The main types include upright, canister, stick, handheld, robotic, and wet/dry vacuums.
Upright vacuum cleaners are popular for carpeted areas. They typically provide strong suction and often include rotating brushes to lift dirt and debris from carpets. Upright models may be bagged or bagless, with bagged vacuums generally requiring less maintenance and producing less dust exposure.
Canister vacuum cleaners are versatile and easier to maneuver under furniture or into corners. They are often more lightweight than upright vacuums and work well on both carpets and hard floors. Canister models are typically quieter and may come with various attachments for cleaning upholstery, drapes, and stairs.
Stick vacuum cleaners are lightweight and convenient for quick cleanups. They are ideal for small apartments or homes with mostly hard floors. Cordless stick vacuums offer flexibility but usually have shorter battery life and less suction than corded models.
Handheld vacuum cleaners are perfect for small areas, car interiors, and tight spaces. They are portable and convenient but are not suitable for cleaning large floor areas efficiently.
Robotic vacuum cleaners automate cleaning for busy households. They navigate floors independently and can maintain regular cleaning schedules. Robotic vacuums work well on hard floors and low-pile carpets but may struggle with deep carpet cleaning or high-pile rugs.
Wet/dry vacuum cleaners are suitable for heavy-duty cleaning, including liquid spills and debris in garages, workshops, or basements. These vacuums are durable and versatile but are generally larger and heavier.
factors to consider before choosing a vacuum cleaner
Several key factors influence which vacuum cleaner is best for your home. These include floor type, suction power, filtration, bagged vs. bagless design, weight, noise level, and attachments.
Floor type is the most important factor. Homes with mostly carpets require vacuums with strong suction and rotating brushes. For hardwood, tile, or laminate floors, a vacuum with adjustable settings and soft brush rolls is preferable. Some vacuums are designed to handle multiple surfaces with minimal adjustment.
Suction power determines how effectively a vacuum removes dirt and debris. Higher suction is ideal for deep carpet cleaning, while moderate suction may be sufficient for hard floors. Some vacuums allow adjustable suction levels to conserve energy or protect delicate surfaces.
Filtration is critical for homes with allergies or pets. HEPA filters capture small particles such as dust, pollen, and pet dander, improving indoor air quality. Washable or replaceable filters provide long-term convenience.
Bagged vs. bagless vacuums each have advantages. Bagged vacuums contain dust more effectively and require less frequent emptying, but replacement bags add ongoing costs. Bagless vacuums eliminate the need for bags but may require more frequent cleaning and can release dust during emptying.
Weight and maneuverability affect how easy the vacuum is to use, especially for multi-story homes or extended cleaning sessions. Lighter models reduce fatigue, while swivel heads and adjustable handles improve maneuverability.
Noise level is another consideration, particularly for shared living spaces. Quieter models improve comfort, especially during early morning or late-night cleaning.
Attachments and accessories enhance versatility. Crevice tools, upholstery brushes, and extension wands allow for targeted cleaning in tight spaces, stairs, furniture, and corners. Pet hair attachments are useful for households with furry companions.
evaluating vacuum cleaner performance
Performance evaluation should include suction effectiveness, dust pickup, and ease of maintenance. Reading independent reviews and checking consumer ratings provides insight into real-world performance.
Testing suction power on different floor types ensures the vacuum meets your needs. High suction is essential for removing embedded dirt from carpets, while smooth floors may require gentle suction to avoid scattering debris.
Ease of maintenance includes emptying dust containers, cleaning filters, and replacing parts. Models with removable, washable components reduce long-term effort and expense.
Energy efficiency is also worth considering. Modern vacuums are designed to provide effective cleaning with lower electricity consumption. Some models offer eco-modes to save energy during light cleaning tasks.
additional features to consider
Many vacuums offer advanced features for convenience and efficiency. Cordless operation provides freedom of movement without worrying about outlets or cord length. Automatic cord rewind simplifies storage for corded models.
Some vacuums include LED lights to illuminate dark corners, making it easier to see and remove debris. Smart technology, such as app integration or programmable cleaning schedules, is common in robotic vacuums.
Adjustable height settings allow customization for different floor types, optimizing suction and brush rotation. Anti-allergen seals and specialized pet filters enhance cleanliness for sensitive households.
budgeting for a vacuum cleaner
Vacuum cleaners vary widely in price, from budget models to high-end professional units. Determining your budget helps narrow options while balancing performance, durability, and features.
Entry-level vacuums are affordable and suitable for small spaces or light cleaning. Mid-range models offer stronger suction, more attachments, and better filtration. High-end vacuums provide advanced features, powerful suction, and enhanced durability for heavy use.
Consider long-term costs such as replacement bags, filters, and maintenance when evaluating value. Investing in a higher-quality vacuum often saves money and effort over time.
tips for choosing the right vacuum
To select the best vacuum cleaner, start by assessing your cleaning needs. Consider floor types, household size, pets, and any allergies. Identify which features are essential versus optional.
Visit stores to test models if possible, checking weight, maneuverability, and comfort. Read consumer reviews and product comparisons for insights on reliability and performance.
Consider the warranty and customer support offered by the manufacturer. A longer warranty can provide peace of mind and protection against defects.
Finally, prioritize features that will make daily cleaning easier and more efficient, ensuring the vacuum fits your lifestyle and home environment.
conclusion
Choosing a vacuum cleaner requires careful consideration of type, features, performance, and budget. Understanding different models, suction power, filtration, and attachments helps match the vacuum to your specific cleaning needs. By evaluating floor type, household requirements, and long-term maintenance, you can select a vacuum cleaner that provides effective cleaning, convenience, and durability. Making an informed decision ensures a cleaner home, improved air quality, and a more efficient cleaning routine.

Diffusers are widely used to spread pleasant aromas throughout a space, improve air quality, and create a calming atmosphere. Whether used for essential oils or simply to add fragrance to a room, diffusers require regular cleaning to function effectively. Over time, oil residue, mineral buildup, and moisture can accumulate inside the device, affecting its performance and potentially shortening its lifespan.
Many cleaning guides recommend vinegar as a primary cleaning agent, but not everyone prefers to use it due to its strong smell or sensitivity to acidic substances. Fortunately, there are several effective ways to clean a diffuser without vinegar while still achieving excellent results. Understanding these alternative methods ensures that your diffuser remains clean, safe, and efficient.
Cleaning a diffuser without vinegar involves using gentle yet effective materials that remove buildup without damaging internal components. With the right approach, you can maintain your diffuser in optimal condition and continue enjoying its benefits.
understanding how diffusers work
Before cleaning a diffuser, it is important to understand how it functions. Most modern diffusers, especially ultrasonic ones, use water and essential oils to create a fine mist that disperses into the air.
Inside the diffuser, there is usually a water tank, a small disc or plate that vibrates to create mist, and electronic components that power the device. Over time, essential oils can leave behind residue on these parts, especially the ultrasonic plate.
This buildup can interfere with the misting process, reduce efficiency, and even cause unpleasant odors. Regular cleaning helps prevent these issues and ensures smooth operation.
Understanding the structure of the diffuser helps you clean it properly without causing damage.
why avoid vinegar in cleaning
While vinegar is commonly used as a natural cleaning agent, some users prefer to avoid it for several reasons. Its strong odor can linger in the diffuser, affecting the fragrance of essential oils during future use.
Vinegar is also acidic, which may not be suitable for certain diffuser materials or components if used frequently or in high concentrations. In some cases, it can cause wear over time.
Additionally, individuals who are sensitive to smells may find vinegar unpleasant to work with. Using alternative cleaning methods eliminates these concerns while still maintaining cleanliness.
Choosing non-vinegar cleaning options allows for a more neutral and user-friendly cleaning experience.
basic cleaning after each use
Performing a quick clean after each use is one of the best ways to prevent buildup in your diffuser. This simple routine reduces the need for deep cleaning later.
Start by unplugging the diffuser and emptying any remaining water from the tank. Wipe the inside of the tank with a soft, dry cloth to remove moisture and oil residue.
If there is visible residue, use a slightly damp cloth with clean water to wipe the surface. Dry the tank thoroughly before storing or using it again.
This basic cleaning step helps maintain hygiene and prevents oils from accumulating over time.
using mild soap and water
One of the simplest alternatives to vinegar is mild soap and water. This method is safe, effective, and suitable for most diffusers.
Fill the diffuser tank with warm water and add a small amount of gentle dish soap. Allow the solution to sit for a few minutes to loosen oil residue.
Use a soft cloth or sponge to gently clean the inside of the tank. Avoid scrubbing too hard, especially near delicate components like the ultrasonic plate.
After cleaning, rinse the tank thoroughly with clean water to remove all soap residue. Any leftover soap can affect the diffuser’s performance or alter the scent of essential oils.
Dry the tank completely before using the diffuser again.
cleaning with rubbing alcohol
Rubbing alcohol is another effective alternative for cleaning diffusers without vinegar. It helps break down oil residue and disinfect the device.
Apply a small amount of rubbing alcohol to a cotton swab or soft cloth. Gently wipe the ultrasonic plate and other areas where residue is present.
This method is especially useful for removing stubborn buildup that soap and water may not fully eliminate. Alcohol evaporates quickly, leaving no strong odor behind.
Use this method sparingly and ensure the diffuser is unplugged before cleaning.
using hydrogen peroxide solution
Hydrogen peroxide is a mild disinfectant that can be used to clean diffusers without vinegar. It helps remove bacteria and buildup while being gentle on most surfaces.
Mix a small amount of hydrogen peroxide with water and pour it into the diffuser tank. Let the solution sit for a few minutes to break down residue.
Afterward, wipe the tank with a soft cloth and rinse thoroughly with clean water. Ensure that all traces of the solution are removed before drying.
This method is particularly useful for maintaining hygiene and preventing microbial growth inside the diffuser.
cleaning hard to reach areas
Diffusers often have small corners, edges, and components that are difficult to clean with a cloth alone. Proper cleaning of these areas ensures complete maintenance.
Cotton swabs or soft brushes can be used to reach tight spaces. Dip the swab in water, alcohol, or a mild cleaning solution and gently clean these areas.
Pay special attention to the ultrasonic plate, as buildup here can directly affect the diffuser’s performance. Clean it carefully to avoid damage.
Taking the time to clean hard-to-reach areas ensures thorough cleaning and better functionality.
removing stubborn oil buildup
Essential oils can sometimes leave a sticky or stubborn residue inside the diffuser. Removing this buildup requires a bit more effort.
Using warm water combined with a few drops of mild soap can help loosen the residue. Let the solution sit longer if needed.
For particularly stubborn spots, rubbing alcohol applied with a cotton swab can break down the oil effectively. Gently wipe until the residue is removed.
Avoid using sharp tools or abrasive materials, as they can damage the diffuser’s interior.
drying the diffuser properly
Proper drying is an important step after cleaning. Moisture left inside the diffuser can lead to mold, bacteria growth, or unpleasant odors.
After rinsing, use a clean, dry cloth to wipe the tank and components. Allow the diffuser to air dry in a well-ventilated area.
Ensure that all parts are completely dry before reassembling or using the diffuser. This helps maintain hygiene and prevents future issues.
establishing a regular cleaning routine
Consistency is key to keeping your diffuser in good condition. Establishing a regular cleaning routine prevents buildup and extends the life of the device.
Light cleaning after each use and deeper cleaning once a week is usually sufficient for most users. If the diffuser is used frequently, more frequent cleaning may be required.
Regular maintenance ensures that the diffuser continues to produce a consistent mist and pleasant aroma.
common mistakes to avoid
There are several common mistakes to avoid when cleaning a diffuser. Using harsh chemicals can damage the device and affect its performance.
Overfilling the tank with water or cleaning solutions can also cause problems. Always follow the recommended levels.
Scrubbing too hard or using abrasive tools can scratch or damage internal components. Gentle cleaning is always more effective.
Ignoring regular cleaning can lead to heavy buildup, making the process more difficult and reducing the diffuser’s efficiency.
Avoiding these mistakes helps maintain the quality and functionality of the diffuser.
maintaining diffuser performance
Keeping your diffuser clean directly impacts its performance. A clean diffuser produces a consistent mist and allows essential oils to disperse effectively.
Using clean water and high-quality oils can also reduce residue buildup. Emptying the tank after each use prevents stagnant water and odors.
Proper maintenance not only improves performance but also extends the lifespan of the diffuser.
conclusion
Cleaning a diffuser without vinegar is entirely possible using simple and effective alternatives such as mild soap, rubbing alcohol, and hydrogen peroxide. These methods remove oil residue, maintain hygiene, and ensure that the diffuser operates efficiently without leaving behind strong odors.
By understanding how diffusers work and following proper cleaning techniques, you can keep your device in excellent condition. Regular cleaning, careful handling, and proper drying are essential for maintaining performance and longevity.
With consistent care and the right approach, your diffuser can continue to provide a refreshing and pleasant atmosphere for a long time.

2566966212: Complete Guide, Identification, Uses, and Important Details

4023164651: Meaning, Details, and Complete Information Explained

Wrenwylde26: Complete Overview, Meaning and Latest Information

Does a Check Engine Light Fail Inspection?
How to Adjust U-Haul Mirrors for Safe Driving
How to Load a 10′ U-Haul Truck Efficiently
-

 Biography2 weeks ago
Who is Diven Labollita? Biography, Career, and Updates
-

 Entertainment2 weeks ago
How Much is Juan Ibarra Worth? Net Worth and Earnings (2026)
-

 General2 days ago
Dixkidzoz: Complete Guide, Features, Benefits, and Latest Information
-
 Blog2 days ago
Wrenwylde26: Complete Overview, Meaning and Latest Information
-
 General1 day ago
2566966212: Complete Guide, Identification, Uses, and Important Details
-
 General2 days ago
4023164651: Meaning, Details, and Complete Information Explained