Home
Working Mom Daily Cleaning Schedule

A Working Mom faces one of the toughest balancing acts in modern life — managing a professional career while maintaining a clean, organized home and caring for her family. Between office meetings, school drop-offs, and family dinners, it can be difficult to find time for household chores. However, a well-structured daily cleaning schedule can make all the difference.
This article provides a practical, research-based cleaning plan that fits into the busy lifestyle of a working mom, helping you keep your home tidy without feeling overwhelmed.
Why a Working Mom Needs a Daily Cleaning Schedule
For most working mothers, cleaning often becomes a weekend burden. But cleaning the entire house at once can lead to exhaustion and frustration. Instead, breaking tasks into small daily routines can keep your home spotless while freeing up time for relaxation and family.
Here are a few reasons why a daily schedule is essential:
- Reduces stress: Clutter can cause anxiety and decrease focus.
- Saves time: Daily cleaning prevents mess from piling up.
- Improves hygiene: Regular maintenance stops bacteria, allergens, and dust buildup.
- Encourages family participation: Everyone knows what needs to be done.
- Creates balance: Allows moms to manage both career and home efficiently.
By following a structured daily cleaning routine, a working mom can maintain harmony between her professional and personal life.
Key Principles for a Successful Cleaning Routine
Before creating a daily plan, it’s important to understand the foundation of an efficient schedule.
1. Prioritize Critical Areas
Focus first on spaces that affect daily comfort the most — kitchen, bathrooms, and living rooms.
2. Keep Tasks Manageable
Avoid overwhelming yourself. Clean one section at a time rather than the entire house.
3. Use Short Cleaning Bursts
Fifteen to twenty minutes of focused cleaning daily is better than hours of chaos on weekends.
4. Declutter Regularly
Clutter increases cleaning time. Donate or discard items you no longer use.
5. Make It a Family Habit
Assign tasks to kids and your partner. Shared responsibility keeps the home in shape.
Morning Cleaning Routine for a Working Mom
The morning is a busy time, but a quick cleaning session can set a positive tone for the day. Here’s how you can fit cleaning into your morning routine:
- Make all the beds: Takes just 5 minutes but transforms room appearance.
- Wipe bathroom counters and mirrors.
- Empty the dishwasher or air-dry utensils.
- Put away clothes or laundry from the night before.
- Sweep kitchen and dining area for a clean start.
This routine takes only 15–20 minutes and ensures that you leave a clean, peaceful home before heading to work.
Evening Cleaning Routine
Evenings are perfect for resetting the home after a long workday. A small daily effort keeps things manageable.
- Load and run the dishwasher.
- Wipe kitchen counters and dining tables.
- Sweep or vacuum living areas.
- Organize clutter: Put toys, remotes, and papers in their proper places.
- Quick bathroom check: Wipe sinks and faucets.
- Prepare for tomorrow: Lay out clothes, pack lunches, and clean as you go.
This routine prevents the mess from piling up overnight and makes mornings smoother.
Weekly Cleaning Breakdown
To maintain a spotless home without exhausting yourself, divide larger tasks across the week. Here’s a sample schedule:
| Day | Focus Area | Tasks |
|---|---|---|
| Monday | Laundry | Wash and fold clothes, change linens. |
| Tuesday | Kitchen | Deep clean stove, organize pantry, wipe refrigerator. |
| Wednesday | Bathroom | Clean toilet, scrub shower, disinfect sink. |
| Thursday | Bedroom | Dust furniture, organize closets, vacuum carpet. |
| Friday | Living Room | Wipe electronics, clean sofa, vacuum floor. |
| Saturday | Family Cleaning Day | Declutter, wash windows, outdoor cleanup. |
| Sunday | Rest & Planning | Light tidying, review next week’s chores. |
This schedule ensures every area gets attention without overwhelming your weekdays.
Time-Saving Cleaning Tips for Working Moms
1. Clean As You Go
While cooking, wash utensils or wipe counters immediately. It prevents buildup and saves time later.
2. Use Multitasking Products
Choose cleaners that work on multiple surfaces—kitchen counters, bathroom tiles, and glass.
3. Set a Timer
Give yourself 10–15 minutes per task. You’ll be surprised how much can be done in short bursts.
4. Keep Cleaning Tools Accessible
Store cleaning supplies in easy-to-reach places like under the sink or in bathroom cabinets.
5. Declutter Before Deep Cleaning
Tidying up before actual cleaning reduces total effort.
6. Involve the Family
Assign simple chores to children like making their beds or sorting laundry.
Creating Your Own Cleaning Checklist
Every household is unique, so you should customize your daily cleaning checklist to fit your needs.
Step 1: List every room and the tasks needed regularly.
Step 2: Group tasks as daily, weekly, or monthly.
Step 3: Estimate how long each task takes.
Step 4: Schedule chores around your work hours.
Step 5: Adjust the plan every few weeks to stay efficient.
A checklist keeps you organized and helps track what’s done and what’s pending.
Quick Daily Cleaning Schedule Example
Morning (15–20 minutes)
- Make beds
- Wipe down counters
- Load dishwasher
Evening (30 minutes)
- Clean kitchen and dining area
- Sweep floors
- Organize clutter
Weekly (45–60 minutes per day)
- Focus on one big cleaning area each day (bathroom, kitchen, bedrooms, etc.)
Monthly
- Deep clean appliances, curtains, and under furniture.
This simple schedule divides work evenly throughout the week, making it less stressful.
How to Stay Motivated
Consistency is the hardest part of maintaining a cleaning routine. Here are some motivation hacks:
- Set realistic expectations: Perfection isn’t required. A “clean enough” home is perfectly fine.
- Use music or audiobooks while cleaning to make it enjoyable.
- Reward yourself: After completing a week’s schedule, treat yourself to something small.
- Get the family involved: Cleaning becomes easier and faster when shared.
Benefits of Following a Daily Cleaning Routine
- Peace of Mind: A clean home promotes relaxation after a long day.
- More Family Time: No need to spend weekends doing heavy cleaning.
- Improved Health: Regular cleaning reduces germs, dust, and allergies.
- Increased Productivity: A tidy home helps focus better on work and parenting.
- Teaches Kids Responsibility: Children learn to value cleanliness and teamwork.
The benefits go beyond a clean house—they improve mental well-being and strengthen family cooperation.
Monthly Deep Cleaning Routine
Even with a daily cleaning schedule, some areas require deep cleaning once a month.
- Clean behind appliances like the refrigerator or oven.
- Wash curtains, rugs, and pillow covers.
- Disinfect garbage bins and door handles.
- Organize storage closets.
- Vacuum furniture and clean under beds.
By tackling one or two of these deep tasks every weekend, you’ll keep your home fresh all year long.
Balancing Work, Family, and Cleaning
Finding balance is the real goal of a working mom. Remember, you’re not just cleaning—you’re creating a healthy and comfortable environment for your loved ones.
Here’s how to keep things manageable:
- Use weekends for rest and light organization.
- Accept help when offered.
- Avoid comparison with others—every family’s lifestyle is different.
- Plan ahead for busy weeks by prepping meals and cleaning supplies early.
When you approach cleaning as a small daily routine instead of a giant task, it becomes part of your rhythm instead of a burden.
Final Thoughts
A Working Mom Daily Cleaning Schedule isn’t about perfection—it’s about consistency, efficiency, and peace of mind. By breaking down chores into manageable chunks, you can maintain a clean and stress-free home while excelling at work and parenting.
Small, daily habits like making the bed, wiping surfaces, and managing clutter have a huge impact over time. With discipline, planning, and family cooperation, any working mom can create a balanced routine that fits her busy lifestyle.
The secret is simple: clean a little each day, and you’ll never feel buried in mess again.

Foam cushions are widely used in homes, offices, cars, and outdoor furniture because they provide comfort, support, and durability. Whether you have seat cushions on your sofa, patio chairs, dining chairs, mattresses, or decorative pillows, knowing how to wash foam cushions properly is essential to maintain hygiene and extend their lifespan. Foam materials can trap dust, sweat, food particles, pet hair, and moisture over time. Without proper cleaning, they may develop unpleasant odors, stains, mold, or mildew.
Cleaning foam cushions requires a careful approach because foam is highly absorbent and delicate when wet. Using the wrong method can damage the structure, cause shrinkage, or lead to long drying times that promote mold growth. This comprehensive guide explains how to wash foam cushions safely, step by step, using the correct techniques for different situations.
Understanding Different Types of Foam Cushions
Before washing foam cushions, it is important to understand what type of foam you are dealing with. Different foams react differently to water and cleaning solutions.
Polyurethane foam is the most common type used in furniture cushions. It is soft, lightweight, and absorbs water easily. Memory foam, often used in mattresses and premium cushions, is denser and more sensitive to moisture. Latex foam is more resilient and naturally resistant to mold but still requires careful handling during cleaning. Outdoor cushions may contain quick-dry foam designed to allow water to pass through more easily.
Identifying your foam type helps determine the safest cleaning method. Always check manufacturer care instructions if available.
When Should You Wash Foam Cushions
You do not need to wash foam cushions frequently unless they are heavily soiled. However, certain situations require immediate cleaning. Spills from drinks, food stains, pet accidents, or visible dirt buildup should be addressed quickly. If cushions start to smell musty, it may indicate moisture retention or bacterial growth. Seasonal deep cleaning is recommended for outdoor furniture and high-traffic seating areas.
Regular vacuuming and spot cleaning can reduce the need for full washing. Preventive maintenance helps extend the life of foam cushions.
Preparing to Wash Foam Cushions
Proper preparation ensures better cleaning results and prevents damage. Start by removing the cushion covers if they are removable. Most covers can be machine washed separately according to fabric instructions. Never wash foam inserts in a washing machine unless specifically stated by the manufacturer, as the agitation can tear or distort the foam.
Take the foam cushions outdoors or to a well-ventilated area. Gather mild detergent, warm water, a spray bottle, soft cloths, a sponge, and a vacuum cleaner with an upholstery attachment. Avoid harsh chemicals, bleach, or strong solvents because they can break down foam structure.
If there are large debris particles, use a vacuum cleaner to remove dust, crumbs, and pet hair before applying any moisture.
How to Spot Clean Foam Cushions
Spot cleaning is the safest and most recommended method for most foam cushions. This method targets stains without soaking the entire cushion.
Mix a small amount of mild liquid detergent with warm water in a bowl. Dip a clean sponge or cloth into the solution and gently blot the stained area. Avoid scrubbing aggressively because it can damage the foam’s surface and push stains deeper.
Continue blotting until the stain begins to lift. Then use a clean damp cloth with plain water to remove soap residue. Press gently with a dry towel to absorb excess moisture. Allow the cushion to air dry completely in a well-ventilated area before placing it back in its cover.
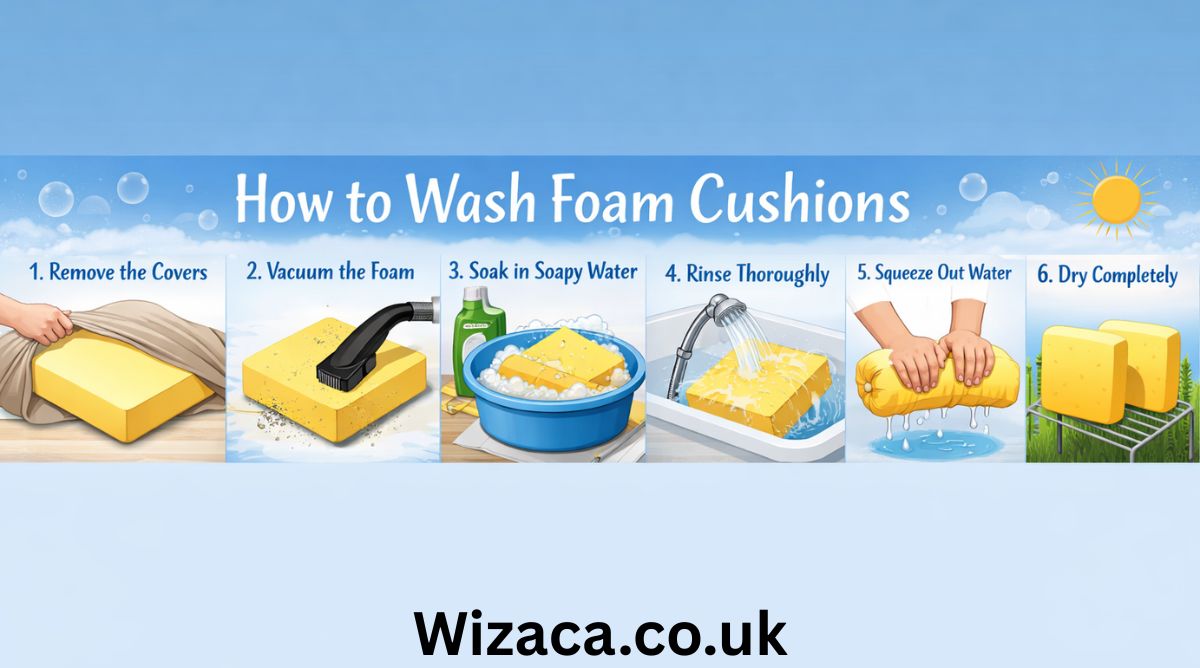
How to Deep Wash Foam Cushions
If the cushion is heavily soiled or has absorbed odors, a deeper cleaning may be necessary. Fill a bathtub or large basin with lukewarm water and add a small amount of mild detergent. Submerge the foam cushion and gently squeeze it to allow the soapy water to penetrate. Do not twist or wring the foam, as this can tear it.
After soaking for about 10 to 15 minutes, drain the soapy water and refill the tub with clean water. Gently squeeze the cushion repeatedly to rinse out the detergent. Continue rinsing until no soap bubbles remain.
To remove excess water, press down on the cushion firmly with both hands. Do not wring it. Place the cushion on a flat surface and press with towels to absorb as much water as possible.
Drying Foam Cushions Properly
Drying is the most critical step when learning how to wash foam cushions. Foam retains water deeply, and improper drying can lead to mold growth. Always air dry foam cushions in a well-ventilated area. Placing them outside in the shade on a warm day is ideal. Avoid direct sunlight for extended periods because UV rays can weaken foam material.
Stand the cushion upright to allow air circulation on all sides. You may use fans to speed up drying. Depending on the thickness and humidity level, drying may take 24 to 48 hours. Ensure the cushion is completely dry before placing it back into its cover.
Never use a dryer or high heat source, as heat can shrink or damage foam.
Removing Odors from Foam Cushions
Odors often develop due to trapped moisture, sweat, or spills. Baking soda is an effective natural deodorizer. Sprinkle a generous amount of baking soda over the entire surface of the foam cushion and let it sit for several hours or overnight. Then vacuum thoroughly to remove the powder.
For stronger odors, you may use a mixture of white vinegar and water in a spray bottle. Lightly mist the cushion without soaking it. Vinegar helps neutralize bacteria and smells. Allow the cushion to air dry completely.
Cleaning Mold or Mildew from Foam Cushions
Mold can form if foam cushions remain damp for extended periods. If you notice black, green, or gray spots accompanied by a musty smell, act quickly.
Take the cushion outdoors to prevent spreading spores indoors. Brush off visible mold gently using a soft brush. Mix equal parts of water and white vinegar and lightly apply it to the affected area. Let it sit for about 15 minutes before blotting with a clean cloth. Avoid soaking the foam.
Dry the cushion thoroughly in direct airflow. If mold growth is severe and deeply embedded, replacing the foam may be safer for health reasons.
Washing Outdoor Foam Cushions
Outdoor cushions are exposed to rain, dust, pollen, and sun. Many outdoor cushions are made with quick-dry foam that allows water to pass through more easily. Even so, proper cleaning is essential.
Remove covers and wash them separately. Rinse the foam cushion with a garden hose to remove loose dirt. Use mild soap and a sponge to clean surface stains. Rinse thoroughly and stand upright to dry in an airy, sunny area. Outdoor foam typically dries faster than indoor foam.
Regular cleaning during outdoor seasons helps prevent mildew buildup.
Mistakes to Avoid When Washing Foam Cushions
One common mistake is putting foam cushions in a washing machine. The agitation cycle can tear the foam apart. Another mistake is using hot water or strong chemicals, which degrade foam structure. Twisting or wringing foam to remove water can cause permanent deformation.
Skipping proper drying is also dangerous. Even if the surface feels dry, internal moisture may remain. Always allow extra drying time to ensure full dryness.
Maintenance Tips to Keep Foam Cushions Clean Longer
Prevention reduces the need for frequent deep washing. Use washable covers whenever possible. Vacuum cushions weekly to remove dust and debris. Address spills immediately before they soak in. Rotate cushions regularly to distribute wear evenly.
For homes with pets or children, consider using waterproof liners under fabric covers. Store outdoor cushions in a dry place during rainy seasons. Proper storage prevents moisture accumulation.
How Often Should You Wash Foam Cushions
The frequency of washing depends on usage. Indoor sofa cushions may need deep cleaning once or twice a year, while outdoor cushions may require seasonal washing. Spot cleaning should be done immediately after spills. Regular vacuuming should be part of weekly cleaning routines.
If someone in the household suffers from allergies, more frequent cleaning may help reduce dust mites and allergens.
Special Care for Memory Foam Cushions
Memory foam requires extra caution because it is denser and absorbs water more slowly. Avoid full submersion whenever possible. Spot cleaning is strongly recommended. If deep cleaning is necessary, use minimal water and ensure extended drying time.
Memory foam can lose its supportive structure if handled roughly. Always press gently instead of squeezing aggressively.
Final Thoughts on How to Wash Foam Cushions
Learning how to wash foam cushions correctly can significantly extend their lifespan and maintain a fresh, hygienic environment in your home. The key principles include using mild cleaning solutions, avoiding excessive water, never using harsh chemicals, and ensuring complete drying before reuse. Whether you are dealing with light stains, heavy dirt, or unpleasant odors, applying the proper cleaning techniques will help keep your foam cushions comfortable and long-lasting.
By following the correct methods and avoiding common mistakes, you can preserve the quality, shape, and durability of your cushions for years to come. Regular maintenance combined with proper washing techniques ensures that your seating remains clean, supportive, and inviting in every season.
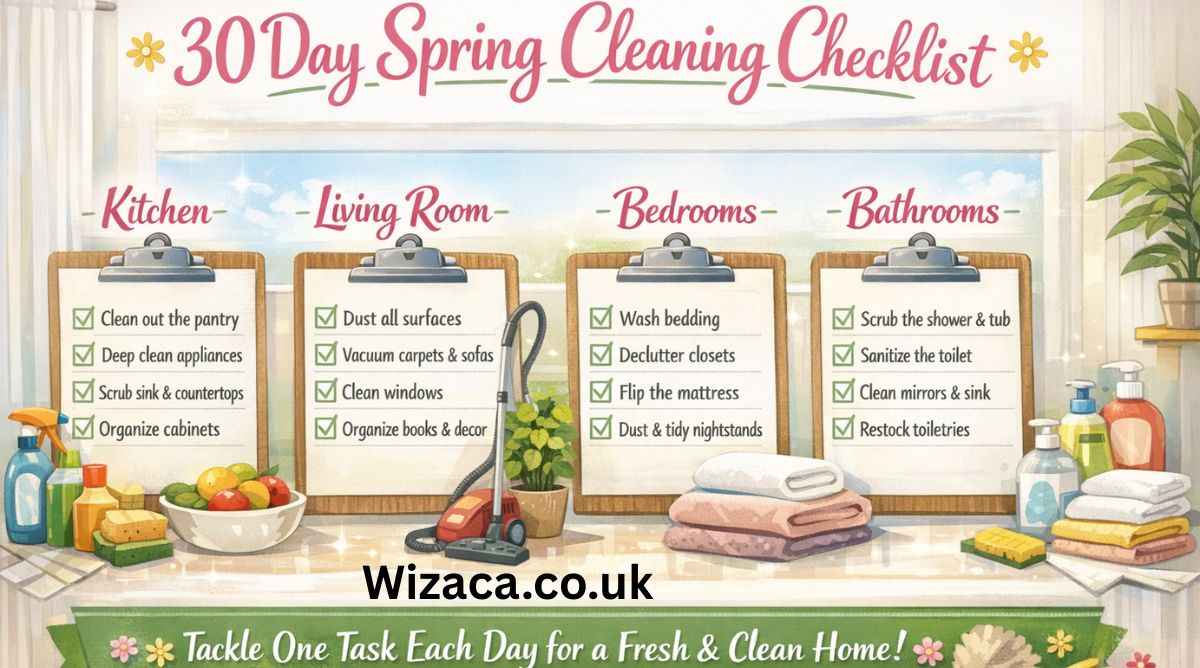
Spring cleaning is more than just a seasonal habit; it is a complete reset for your home, your routines, and even your mindset. A 30 day spring cleaning checklist breaks down what can feel like an overwhelming task into simple, manageable daily actions. Instead of trying to clean everything in a single exhausting weekend, this approach allows you to make steady progress while maintaining balance in your daily life.
This detailed guide is designed to help you clean, organize, refresh, and maintain every part of your home over the course of thirty days. Each section focuses on a specific area or theme, ensuring nothing is missed and everything gets the attention it deserves.
Understanding the Purpose of a 30 Day Spring Cleaning Checklist
A structured 30-day plan turns spring cleaning into a habit rather than a chore. By focusing on one task per day, you reduce stress and avoid burnout. This method also ensures deeper cleaning, as you are not rushing through tasks.
The checklist approach encourages consistency, accountability, and visible progress. Each completed day builds motivation to continue, making the entire process more satisfying and effective.
Preparing Your Home Before You Begin
Before starting the checklist, preparation is key. Spend a little time gathering basic cleaning supplies and mentally committing to the process. You do not need expensive tools, but having essentials ready will save time and frustration later.
Preparation also involves setting realistic expectations. The goal is improvement, not perfection. Some days will feel easier than others, and that is completely normal.
Day 1 Focus: Decluttering Entryways
The entryway sets the tone for your entire home. Begin by removing unnecessary items such as old shoes, unused bags, and random clutter. Wipe down surfaces, organize storage areas, and ensure everything has a designated place.
A clean entryway creates a welcoming atmosphere and immediately makes your home feel more organized.
Day 2 Focus: Cleaning Doors and Handles
Doors and handles are often overlooked yet frequently touched. Clean all interior and exterior doors, paying special attention to handles, frames, and edges.
This task improves hygiene and instantly refreshes the appearance of your living space.
Day 3 Focus: Living Room Declutter
The living room is a central gathering space. Remove items that do not belong there, organize shelves, and straighten furniture. Dust surfaces and tidy decorative elements.
A clutter-free living room promotes relaxation and makes everyday use more enjoyable.
Day 4 Focus: Deep Cleaning Living Room Surfaces
After decluttering, focus on deeper cleaning. Vacuum or sweep floors, clean under furniture, and wipe down electronics and light fixtures.
This step enhances air quality and gives the room a noticeably fresher feel.
Day 5 Focus: Window Cleaning
Clean windows throughout the home to let in more natural light. Wipe down sills and frames as well.
Clear windows brighten rooms and enhance the overall atmosphere of your home.
Day 6 Focus: Curtains and Blinds
Curtains and blinds collect dust over time. Shake them out, wash fabric curtains if possible, and wipe down blinds carefully.
This task improves cleanliness and helps reduce allergens in your home.
Day 7 Focus: Kitchen Declutter
Start your kitchen cleaning journey by decluttering. Remove expired food, organize cabinets, and clear countertops.
An organized kitchen makes cooking more enjoyable and efficient.
Day 8 Focus: Cleaning Kitchen Appliances
Focus on appliances such as the refrigerator, oven, microwave, and dishwasher. Clean both interiors and exteriors.
Maintaining appliances improves their performance and extends their lifespan.
Day 9 Focus: Pantry Organization
Organize your pantry by grouping similar items together. Wipe shelves and ensure everything is easily accessible.
A tidy pantry saves time and reduces food waste.
Day 10 Focus: Sink and Countertop Deep Clean
Clean and sanitize sinks, faucets, and countertops. Pay attention to corners and edges where grime builds up.
This enhances both hygiene and appearance.
Day 11 Focus: Bathroom Declutter
Remove unused products, expired toiletries, and empty containers from the bathroom. Organize cabinets and drawers.
A clutter-free bathroom feels calmer and more functional.
Day 12 Focus: Bathroom Deep Cleaning
Scrub sinks, toilets, tubs, and showers thoroughly. Clean mirrors and wipe down surfaces.
This step is essential for maintaining a healthy home environment.
Day 13 Focus: Bedroom Declutter
Clear out items that do not belong in the bedroom. Organize bedside tables, dressers, and closets.
A tidy bedroom supports better rest and relaxation.
Day 14 Focus: Bedding and Mattress Care
Wash bedding, pillows, and mattress covers. Vacuum the mattress and rotate it if needed.
Clean bedding contributes to improved sleep quality.
Day 15 Focus: Closet Organization
Go through your wardrobe and separate items you no longer wear. Arrange clothes by category or season.
An organized closet saves time and reduces daily stress.
Day 16 Focus: Laundry Area Cleaning
Clean the washing machine, dryer, and surrounding area. Organize detergents and supplies.
A clean laundry area makes routine chores more pleasant.
Day 17 Focus: Home Office or Study Area
Declutter desks, organize paperwork, and clean electronics. Arrange cables neatly.
An orderly workspace boosts productivity and focus.
Day 18 Focus: Bookshelves and Storage Units
Dust bookshelves and reorganize items. Remove unnecessary objects and clean surfaces thoroughly.
This task refreshes shared and personal spaces alike.
Day 19 Focus: Floors Throughout the Home
Vacuum, sweep, or mop all floors. Pay attention to corners and hard-to-reach areas.
Clean floors significantly impact the overall cleanliness of your home.
Day 20 Focus: Walls and Baseboards
Wipe down walls and baseboards to remove dust and marks.
This often-forgotten task instantly improves the look of any room.
Day 21 Focus: Lighting Fixtures and Fans
Clean light fixtures, lamps, and ceiling fans.
Removing dust improves lighting quality and air circulation.
Day 22 Focus: Storage Rooms and Cabinets
Organize storage areas, discard unnecessary items, and label boxes if needed.
Well-organized storage prevents future clutter buildup.
Day 23 Focus: Outdoor Spaces
Clean balconies, patios, or porches. Remove debris and organize outdoor furniture.
Refreshing outdoor areas prepares your home for warmer weather.
Day 24 Focus: Garage or Utility Area
Declutter tools, equipment, and storage bins. Sweep floors and wipe surfaces.
A clean utility area improves safety and efficiency.
Day 25 Focus: Trash and Recycling Review
Dispose of accumulated waste responsibly. Organize recycling systems.
This step reinforces cleanliness and environmental responsibility.
Day 26 Focus: Pet Areas
Clean pet beds, feeding areas, and toys. Organize supplies.
Maintaining pet spaces ensures comfort and hygiene for your animals.
Day 27 Focus: Air Quality Improvement
Clean vents, replace filters if needed, and open windows for fresh air.
Improved air quality enhances overall well-being.
Day 28 Focus: Final Declutter Pass
Revisit all rooms and remove any remaining clutter.
This final pass ensures consistency throughout the home.
Day 29 Focus: Maintenance Planning
Create simple routines to maintain cleanliness. Decide what tasks will be done weekly or monthly.
Maintenance prevents the need for major cleaning later.
Day 30 Focus: Reflection and Enjoyment
Take time to appreciate your clean, organized home. Reflect on what worked well and how you can maintain these habits.
Celebrating progress reinforces positive behavior and motivation.
Benefits of Following a 30 Day Spring Cleaning Checklist
This method offers long-term benefits beyond cleanliness. It reduces stress, improves mental clarity, and promotes healthier living.
Breaking tasks into daily steps makes the process achievable and sustainable.
Making Spring Cleaning a Yearly Habit
Once you experience the benefits, repeating this checklist annually becomes easier. You may even adapt it to other seasons.
Consistency transforms spring cleaning from a chore into a lifestyle habit.
Final Thoughts on a 30 Day Spring Cleaning Checklist
A 30 day spring cleaning checklist is a practical, effective way to refresh your home without overwhelming yourself. By dedicating a small amount of time each day, you achieve lasting results that improve both your living space and your quality of life.
With patience, consistency, and intention, this approach turns spring cleaning into a rewarding journey rather than a stressful task.
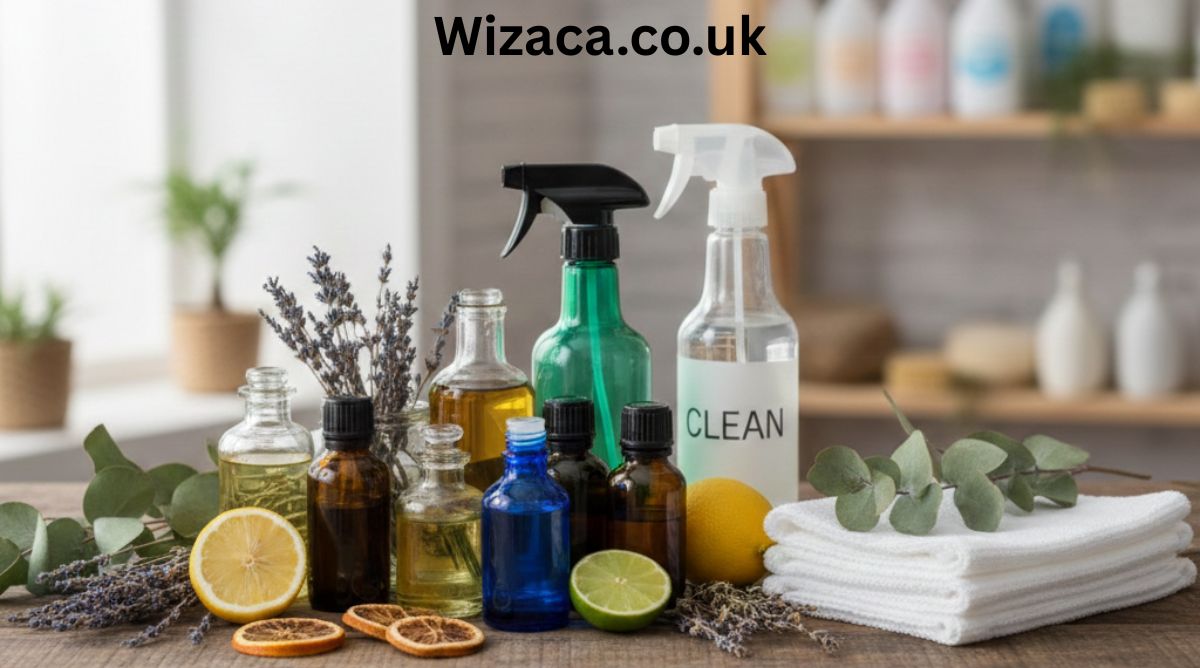
Essential oils have gained popularity not just for aromatherapy or beauty, but also for home cleaning. Their natural disinfectant, antifungal, and antibacterial properties make them a perfect replacement for harsh chemical cleaners. If you’re looking for where to buy essential oils for cleaning, this guide will help you understand what they are, how to use them safely, and the best places to find high-quality products.
What Are Essential Oils?
Essential oils are concentrated plant extracts obtained through methods like distillation or cold pressing. These oils capture the natural fragrance, flavor, and beneficial properties of the source plant.
Different essential oils have different cleaning and disinfecting properties. For example:
- Lemon oil helps remove grease and stains.
- Tea tree oil has strong antifungal and antibacterial qualities.
- Lavender oil provides a pleasant scent while deterring bacteria.
- Peppermint oil keeps pests like ants and spiders away.
When used properly, these oils can make your home smell fresh and clean—without the chemicals found in most store-bought cleaners.
Why Use Essential Oils for Cleaning?
People are increasingly moving toward natural and eco-friendly living. Essential oils fit this trend perfectly. Here’s why they’ve become so popular:
- Non-toxic – They are plant-based and safer around children and pets compared to synthetic cleaners.
- Eco-friendly – Using essential oils reduces plastic waste and chemical runoff into water systems.
- Effective – Many oils naturally kill germs, mold, and mildew.
- Cost-efficient – A few drops go a long way, making each bottle last for months.
- Customizable scents – You can mix oils to create your favorite fragrances.
Switching to natural cleaning solutions not only benefits the environment but also improves indoor air quality.
How Essential Oils Work in Cleaning
Essential oils contain compounds like terpenes, aldehydes, and phenols that have antimicrobial and antifungal properties. When combined with natural cleaning agents like vinegar, baking soda, or castile soap, they become powerful yet safe cleaning solutions.
For instance:
- Mixing lemon oil with vinegar removes grease from kitchen counters.
- Tea tree oil combined with baking soda helps disinfect bathroom tiles.
- Adding eucalyptus oil to laundry can refresh clothes and eliminate odors.
These natural ingredients break down dirt and kill bacteria without leaving harmful chemical residues.
Most Popular Essential Oils for Cleaning
Here are some of the most widely used essential oils for cleaning and their specific purposes:
- Lemon Oil: Great for degreasing kitchen surfaces and adding a citrus scent.
- Tea Tree Oil: Powerful antifungal, excellent for bathrooms and mold removal.
- Lavender Oil: Disinfects surfaces and leaves a soothing scent.
- Eucalyptus Oil: Kills germs and clears odors.
- Peppermint Oil: Keeps insects away while adding freshness.
- Orange Oil: Cuts through grime and sticky residues.
- Thyme Oil: Naturally antibacterial, ideal for deep cleaning.
Each oil serves a unique function, and combining them can enhance overall cleaning power.
Where to Buy Essential Oils for Cleaning
When searching for essential oils, quality matters. Many cheaper products are diluted or synthetically fragranced, making them ineffective for cleaning. Here’s where you can safely buy high-quality essential oils:
1. Health Food Stores
Most health food stores sell essential oils, often carrying trusted brands like Aura Cacia, NOW, or Plant Therapy. The benefit is that you can see the product in person, read the label, and check for purity certifications.
2. Pharmacies and Supermarkets
Some larger pharmacy chains and supermarkets now stock essential oils in their natural product sections. These are convenient options for quick purchases but may have limited variety.
3. Online Retailers
Online shopping platforms like Amazon, iHerb, and Vitacost offer a wide range of essential oils. You can compare prices, read reviews, and check for certifications such as “100% pure” or “GC/MS tested.”
When buying online, always verify that the seller is reputable and that the oil comes in dark amber or cobalt glass bottles to protect it from sunlight.
4. Local Herbal Shops or Markets
Many cities have small herbal or organic shops where local artisans sell handmade or locally sourced essential oils. These can be great if you prefer supporting small businesses or sustainable brands.
5. Direct from Manufacturers
Some companies like doTERRA, Young Living, and Edens Garden allow direct purchase from their official websites. Buying directly ensures you get authentic oils rather than imitations.
How to Check for Quality
Before purchasing, check the following points to ensure you’re buying genuine essential oils suitable for cleaning:
- Label Details: The label should include the Latin botanical name, country of origin, and extraction method.
- Packaging: Genuine essential oils come in dark glass bottles with dropper caps.
- Purity: Look for phrases like “100% pure” and “therapeutic grade.”
- Price: If it seems too cheap, it’s probably diluted.
- Testing: Reputable brands share third-party testing reports (GC/MS results).
Avoid synthetic or “fragrance oils,” as these contain artificial chemicals that do not provide natural cleaning benefits.
How to Use Essential Oils in Cleaning
Once you’ve bought your oils, you can create various cleaning mixtures for your home. Here are a few easy recipes:
1. All-Purpose Cleaner
- 1 cup water
- 1 cup vinegar
- 10 drops lemon oil
- 5 drops tea tree oil
Mix in a spray bottle and shake before use. Works well for countertops and tiles.
2. Glass Cleaner
- 2 cups distilled water
- 2 tablespoons white vinegar
- 10 drops peppermint oil
Use on windows and mirrors for streak-free shine.
3. Disinfecting Bathroom Spray
- 1 cup water
- ½ cup rubbing alcohol
- 10 drops eucalyptus oil
- 10 drops lavender oil
Spray on sinks, tubs, and toilet surfaces for natural disinfection.
4. Laundry Freshener
Add 3–5 drops of orange or lavender oil to your washing machine’s rinse cycle for a clean, refreshing scent.
Storage Tips for Essential Oils
To preserve potency, store essential oils in:
- Dark glass bottles (amber or blue).
- Cool, dry places away from sunlight.
- Tightly sealed containers to prevent evaporation.
Proper storage ensures your oils remain effective for months or even years.
Benefits Beyond Cleaning
Aside from cleaning, essential oils offer many additional benefits:
- Aromatherapy: Promotes relaxation and improves mood.
- Air purification: Some oils, like eucalyptus and tea tree, cleanse the air naturally.
- Skin care: Certain oils, like lavender, help soothe minor cuts or burns (when diluted).
Their versatility makes them valuable for every household.
Safety Precautions When Using Essential Oils
Even natural products can be harmful if misused. Keep these safety tips in mind:
- Always dilute oils before using on surfaces.
- Avoid contact with eyes or direct skin exposure.
- Keep oils away from children and pets.
- Do not mix incompatible oils (like citrus with bleach).
- Use gloves when cleaning for extended periods.
Following these precautions ensures your cleaning routine remains safe and effective.
Why Essential Oils Are a Smarter Cleaning Choice
Switching to essential oils allows you to clean your home while protecting your family’s health and the environment. Unlike synthetic cleaners, these oils:
- Contain no artificial dyes or fragrances.
- Break down easily without polluting water.
- Offer pleasant, natural aromas.
- Disinfect surfaces without residue.
They’re a simple, sustainable alternative to commercial cleaning products.
Final Thoughts
If you’re searching for where to buy essential oils for cleaning, focus on reputable sources that guarantee purity and authenticity. Whether purchased online, from local markets, or directly from manufacturers, high-quality essential oils will transform your cleaning routine into a natural, healthy, and eco-friendly experience.
With just a few drops, you can eliminate harmful chemicals from your home and embrace a cleaner, greener lifestyle—one that’s safe for your family, your home, and the planet.

How to Set Honuras Time Zone on a WR20BAR G-Shock
How to Sign Up on ETSGamevent
How to Switch Out HZ311 Thermostat for Ecobee Premium Thermostat
Can You Rent a Storage Unit for a Month?
How to Use Non Genuine Ink in Epson Printer
Vinfen Treasurer: Roles, Responsibilities, and Organizational Impact
-
 Home Improvement2 weeks ago
How to Switch Out HZ311 Thermostat for Ecobee Premium Thermostat
-
 Gaming2 weeks ago
How to Sign Up on ETSGamevent
-
 Technology2 weeks ago
How to Use CPT Upgrade in gem5: Complete Step-by-Step Guide
-
 Technology2 weeks ago
How to Tell a Bad Plate on Flex Printing
-
 Technology2 weeks ago
How to Update AMD Software Adrenalin Edition G14
-
 Technology3 hours ago
How to Set Honuras Time Zone on a WR20BAR G-Shock